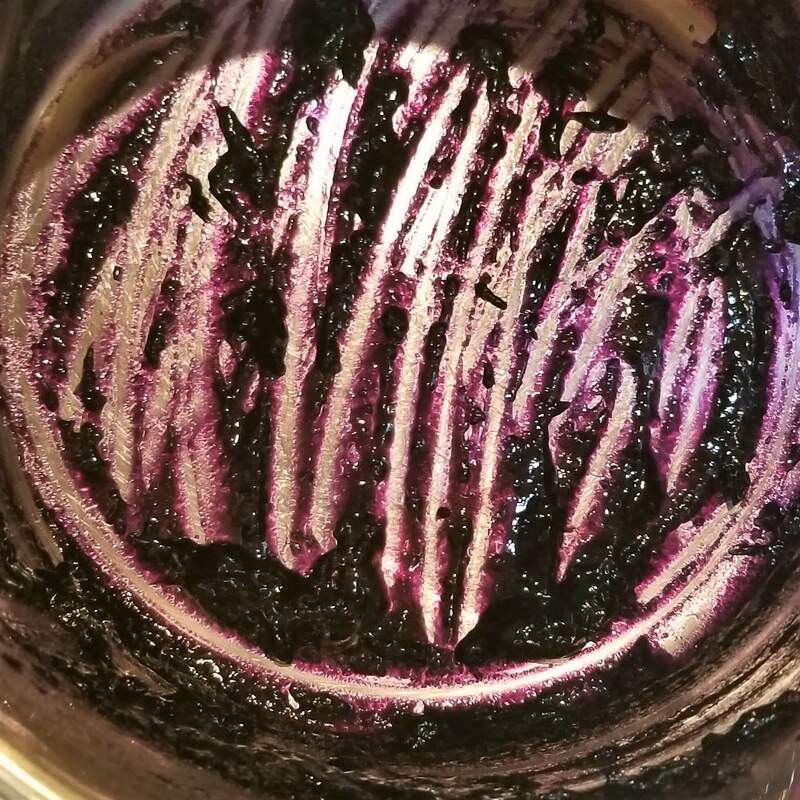
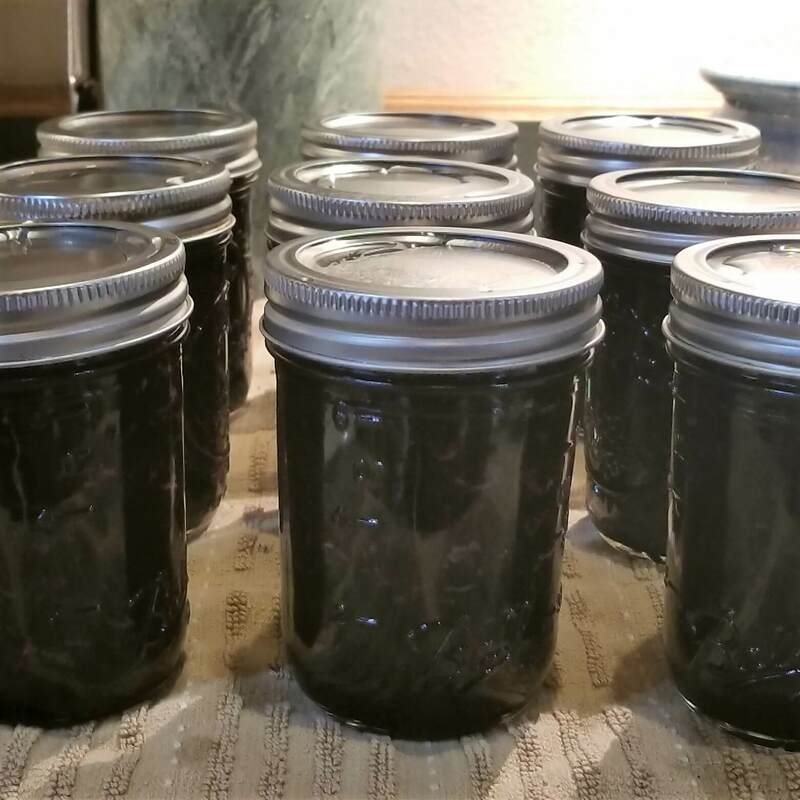
 Our garden huckleberry wine on bottling day. Garden Huckleberry WineAs I mentioned in my previous post, garden huckleberries are a unique berry in the nightshade family. They are toxic when unripe, have little taste when ripe, but when fully ripe AND cooked, they are absolutely delicious and make a beautiful dark purple jam. After making a batch of garden huckleberry preserves, we still had quite a few berries left over in the freezer. Since my husband and I love fermentation we decided to experiment with a one-gallon test batch of garden huckleberry wine. We both have a Bachelor’s degree in biology and I also have a concentration in microbiology so we enjoy the science behind fermented foods and drinks, although neither one of us is an expert. Thus far we have made kombucha, sauerkraut, kimchi, wine and beer from kits, mead, and now garden huckleberry wine. We also currently have a maple wine (which smells absolutely delicious!) undergoing secondary fermentation and will hopefully be the subject of a future blog post. This summer we also would like to experiment with dandelion wine and a spruce-tip beer. We planted wine grapes on our property in the spring of 2017 which will hopefully produce their first grapes this summer (2019) on 3-year-old vines. These grapes, Marquette, are a red grape well suited to our climate (zone 4) however, they can be acidic as short/cool season grapes often have difficulty fully ripening. Therefore, blending is often used to reduce acidity and increase sugar content of these grapes if needed. However, as more growers are cultivating the Marquette variety, they are having success producing a very nice dry red wine or slightly sweet port that is not overly acidic. We are hoping in addition to making 100% Marquette wine we could also find some fruit or other grapes varieties to use for blending. Blackberries or raspberries are commonly used to make a delicious berry-Marquette port. When we realized we had extra garden huckleberries we thought it would be good to practice making wine from scratch rather than a kit and also possibly find a good fruit to blend with the Marquette grapes. In this post, I will assume that the reader already has some experience fermenting. If not, a good place to start is to buy a wine or beer kit, to first determine if you enjoy brewing. Once, you have tried a few kits, read a few books, looked at some websites, and/or listened to some podcasts, it is much easier to experiment with fermenting from scratch. To make our garden huckleberry wine we modified a recipe for blueberry wine (see our modified recipe below). As garden huckleberries must be cooked to bring out their flavor, I first cooked the berries with a little water and crushed them with a potato masher to release the juices. I cooked them for about 20 minutes added 1 tablespoon of lemon juice, cooked an additional 5 minutes, and then added the sugar to the berries and mixed until dissolved. Garden huckleberries are a very tough fruit with an almost leathery skin so in the future I may use an immersion blender to help pulverize the berries rather than just a potato masher.  The garden huckleberry must in the primary fermenter after boiling and crushing the berries. After the sugar was dissolved, we brought the water up to 1 gallon. At this point you can check the specific gravity to make sure the sugar content is correct, generally you want to start wines around 1.090 depending on what you would like your final alcohol concentration to be. When making a fruit wine you would generally add in one Campden tablet/gallon or potassium metabisulfite at the correct concentration to kill any wild yeast on the berries. Since we had just boiled our berries, I assumed most wild yeasts would be killed and skipped this step. We then added the tannin, acid blend, pectic enzyme, and yeast nutrient and mixed well. I am not sure if both the lemon juice and acid blend are necessary and may skip the lemon juice next time. The pectic enzyme will digest the pectin in the fruit which otherwise could make the must gelatinous; also excess pectin will also leave your wine hazy and keep it from clarifying properly. Yeast nutrient is used to help give the yeast a boost, yeast energizer can also be added or you can buy them already mixed together under specific brand names. If fermentation slows before completion you can spike in more nutrient and/or energizer to help push fermentation to completion. Some brewers also like to add in grape juice concentrate to their fruit wines, which increases sugar content so make sure to adjust final sugar levels to the correct specific gravity after mixing this in. This will also make your wine fruitier. As we wished to see what a pure garden huckleberry wine tasted like, we did not add any grape juice concentrate. The last step is to add the yeast. Since we had boiled the berries it was important to make sure the must was not too hot, you generally want it around room temperature. We used Lalvin K1-V1116 yeast which is supposed to be good for fruit wines and also has a high alcohol tolerance (18%). This was also important since we wanted to make sure it would ferment to dryness. We dry pitched the yeast and stirred it in, however, most yeast packets will recommend activating the yeast prior to pitching. If you activate first, make sure you follow the instructions exactly as written, otherwise you may shock the yeast too much which will prevent fermentation from starting. We fermented in a 2-gallon bucket fermenter that we had cleaned with one-step cleanser and sterilized with potassium metabisulfite. Make sure everything that comes in contact with your must is as sterile as possible. After everything was mixed well, we covered the fermenter with a lid containing an airlock to let out the CO2 gas released during fermentation. Generally, you should see bubbling in the airlock within 24-48 hours. 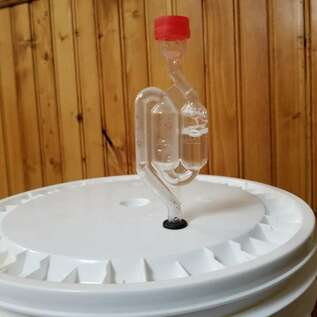 A bubbling airlock which demonstrates active fermentation. With most fruit wines you want to stir the must 1-2 times per day, otherwise the fruit cap will stay on the top and you will have less flavor and color released into the liquid. The more the cap comes in contact with the liquid. the more color, flavor, etc. will be released into the wine. The wine will likely ferment for approximately 2 weeks or even longer depending on the type of yeast used. When bubbling starts to slow you can start testing the specific gravity with your hydrometer and when it reaches 1.010-1.020 you can rack it to a secondary fermenter (a 1 gallon glass carboy/jug) or you can leave it in the primary until it completes fermentation (specific gravity less than 1). Before racking you must strain out the berries and debris and move the wine to a cooler place if possible, to clear. Every week or two, as more debris settles you can rack to a new 1-gallon jug. At this point if fermentation is complete you can cap the jug or use a bung and not worry about the airlock. Make sure fermentation is 100% complete as we have had a batch of mead blow the bung out of the jug when we removed the airlock too soon. You can also add a Campden tablet after each racking or just wait before bottling if you do not like to have too high of sulfite levels in your wine. I do not like to use more than 2 tablets/gallon of wine total. Those who are sensitive to sulfites may wish to try even less or skip it altogether although this does increase the risk of contamination. Once the wine has clarified to your liking you can bottle the wine and age it, generally 3-6 months minimum. If you prefer a sweeter wine you can back sweeten before bottling but you must add in potassium sorbate to prevent fermentation in the bottle. You can also add in potassium sorbate if you wish to age your wine longer and prevent spoilage. We tasted a glass of our wine before bottling and were very impressed by its taste. It was slightly sour (maybe skipping the lemon juice next time would be better), slightly bitter and tannic, with definite flavors of garden huckleberries. Although it started out as a very dark purple color it mellowed to a more red-purple color. If you prefer your wines with more intense flavors you can add more than 3 lbs of fruit and if you prefer them lighter, you can add less. Overall, we liked the initial flavor of the wine well enough that I started dozens of garden huckleberry plants this spring (as opposed to the 6 plants we had last year) so we can hopefully make a larger 3-5 gallon batch next year. 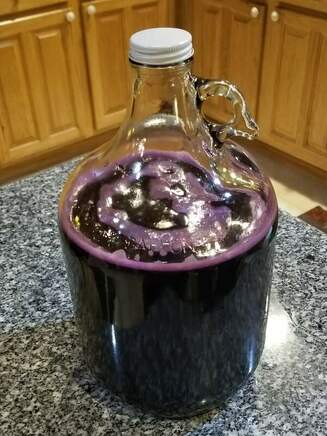 Garden huckleberry wine that has been clarified and is ready to bottle. Garden Huckleberry Wine Recipe (1 Gallon)3 lbs berries (garden huckleberries, blueberries, or other berries) 1 T lemon juice ~1.8 lbs sugar 0.5 tsp acid blend 0.5 tsp pectic enzyme 0.6 tsp yeast nutrient 0.2 tsp tannin Campden tablets (1 tablet per gallon) 1 package yeast (Lalvin EC-1118, Lalvin 71B-1122, Lalvin K1-V1116, or others)  Wine corks ready for bottling.
14 Comments
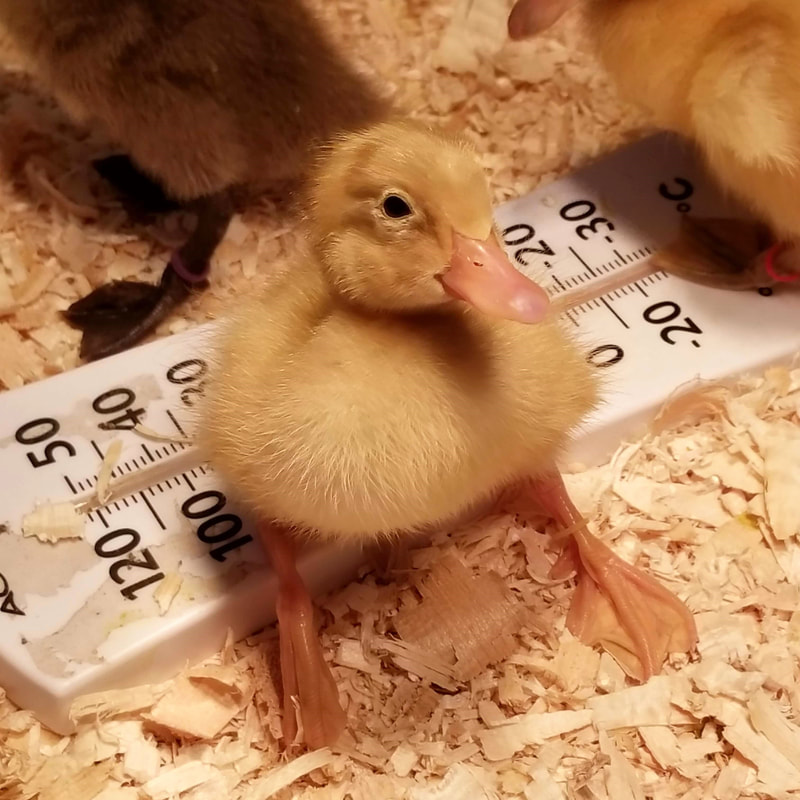
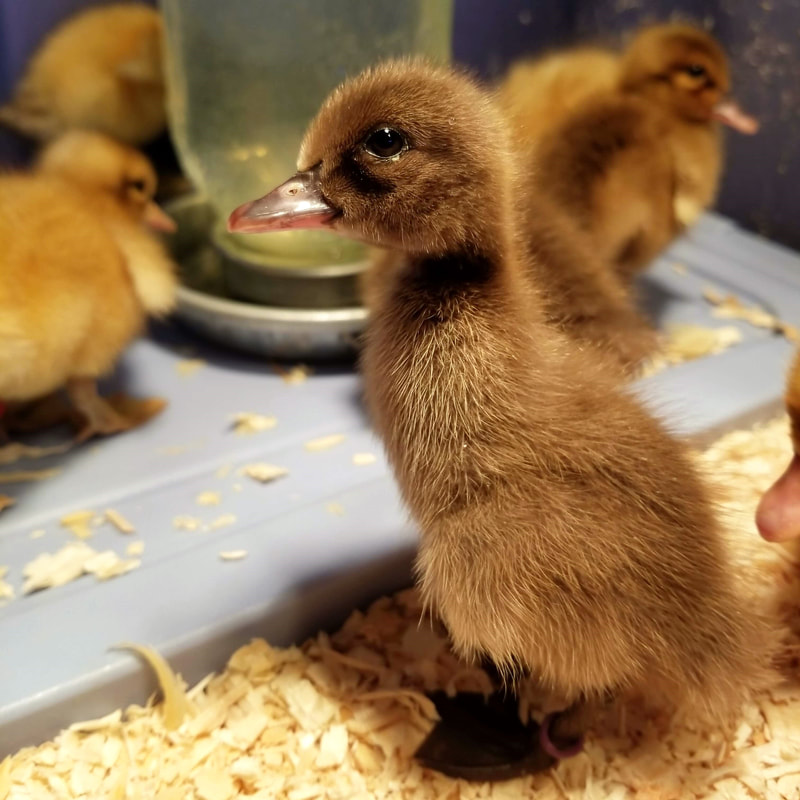
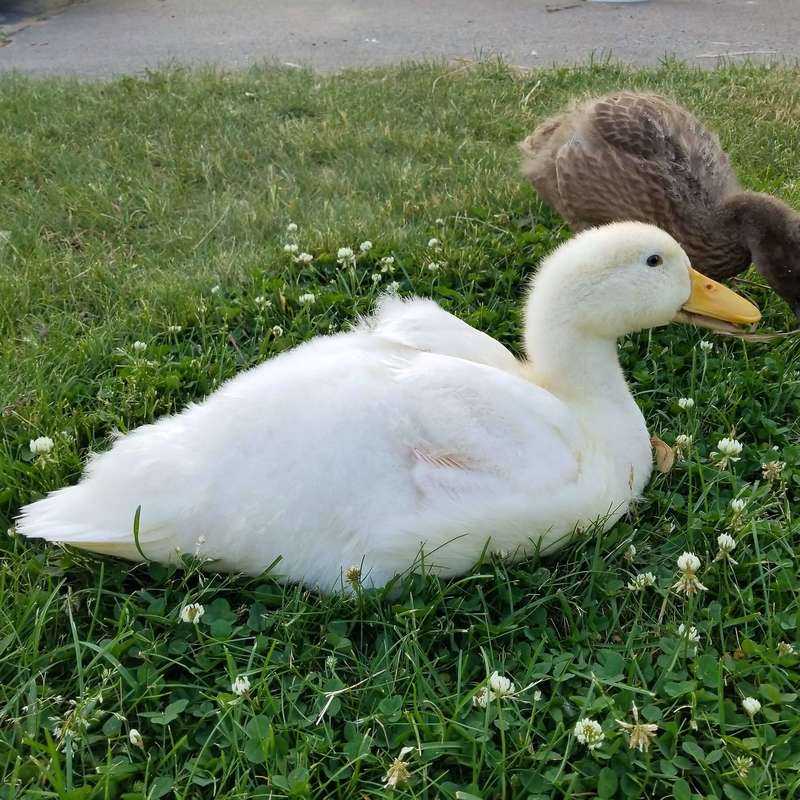
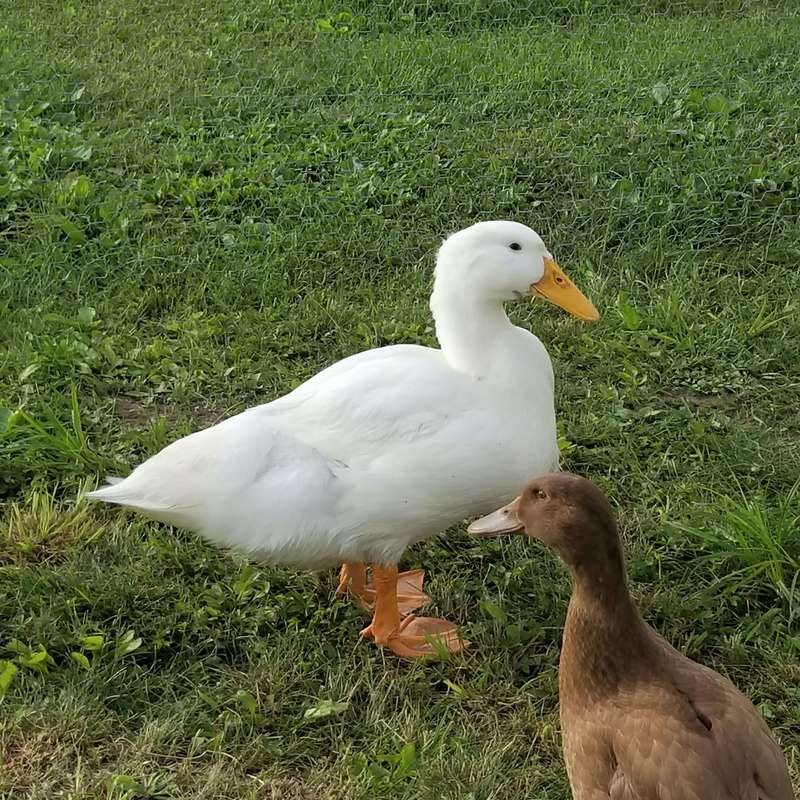
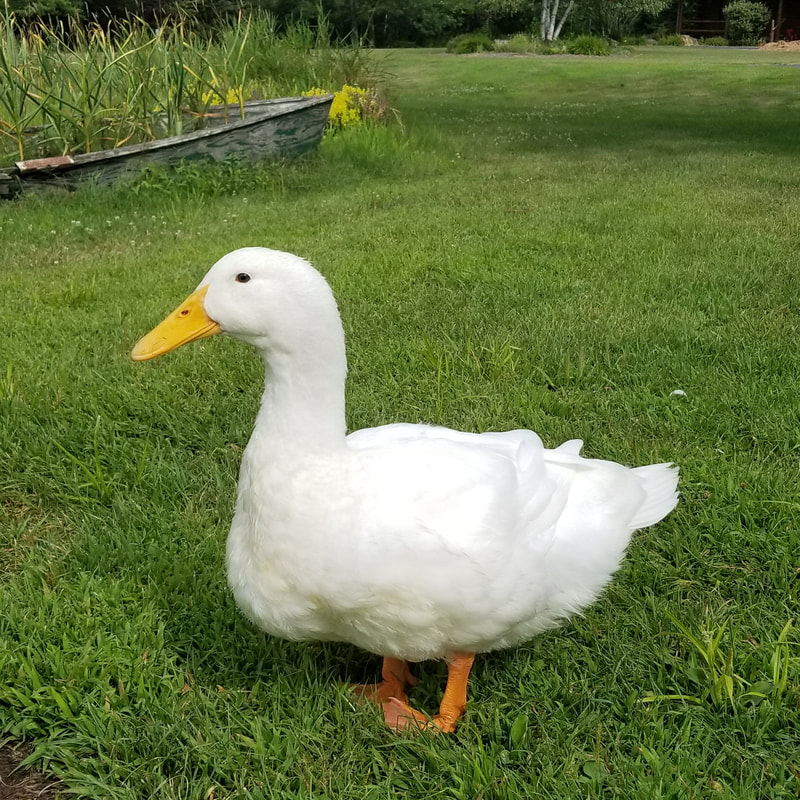
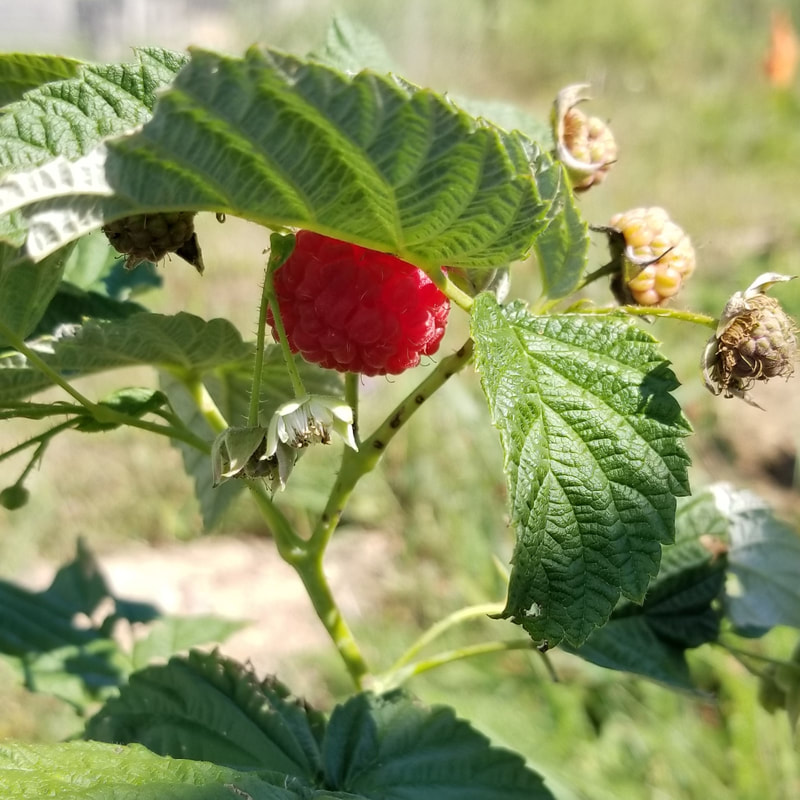
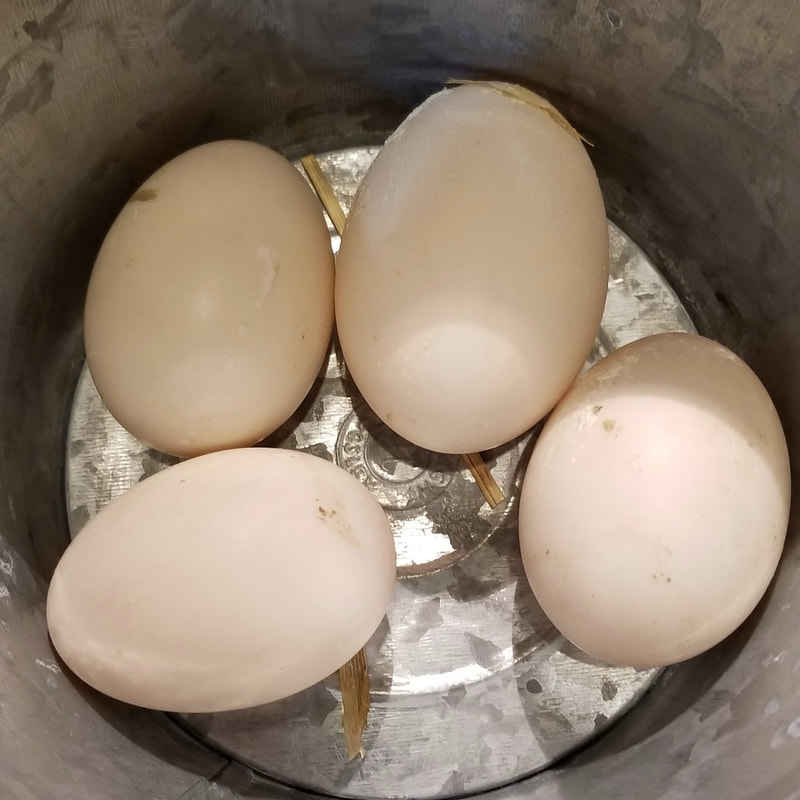
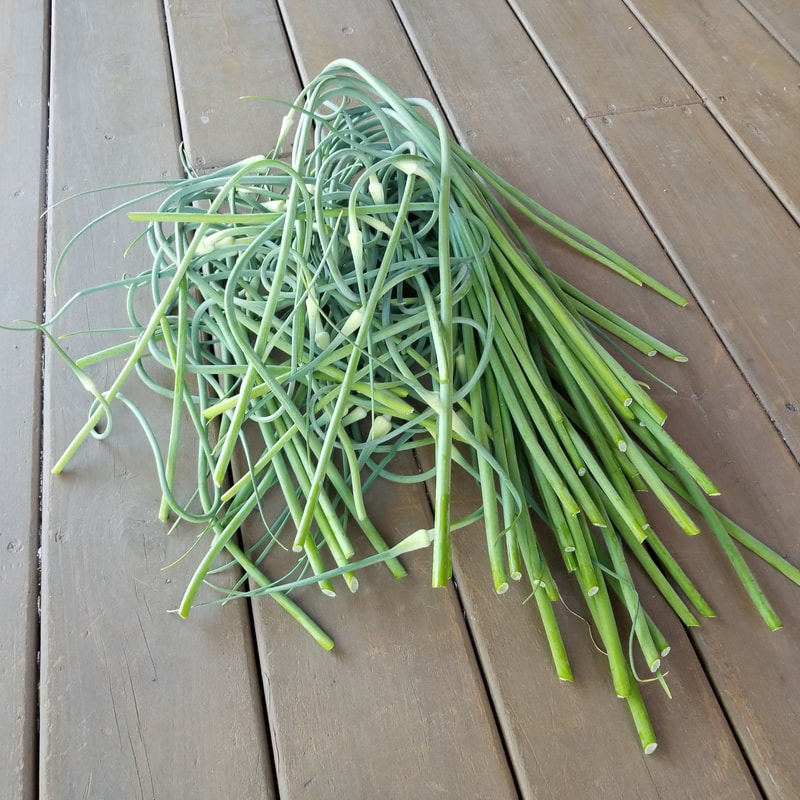
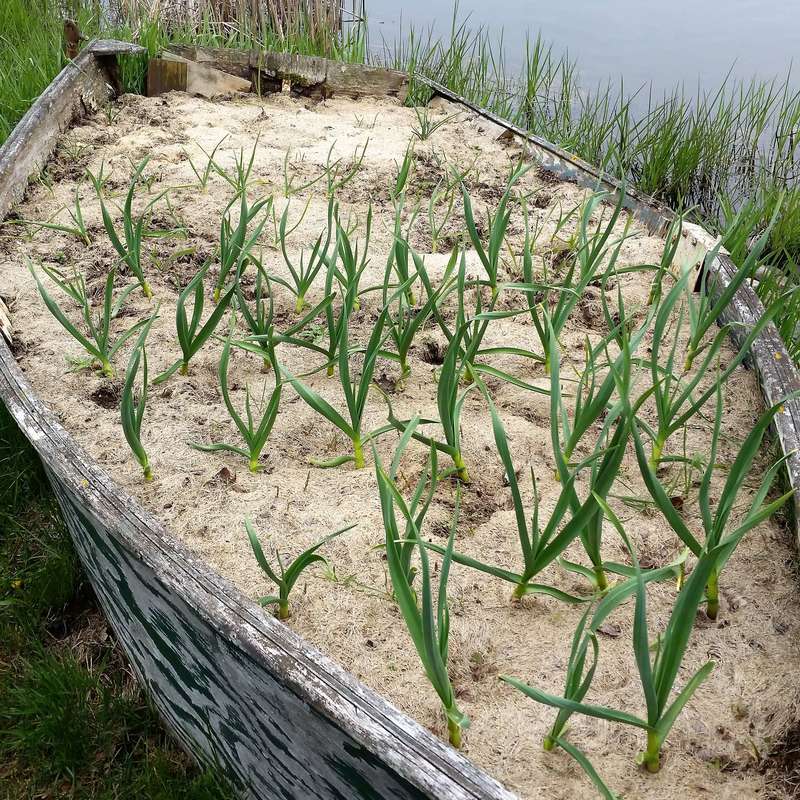
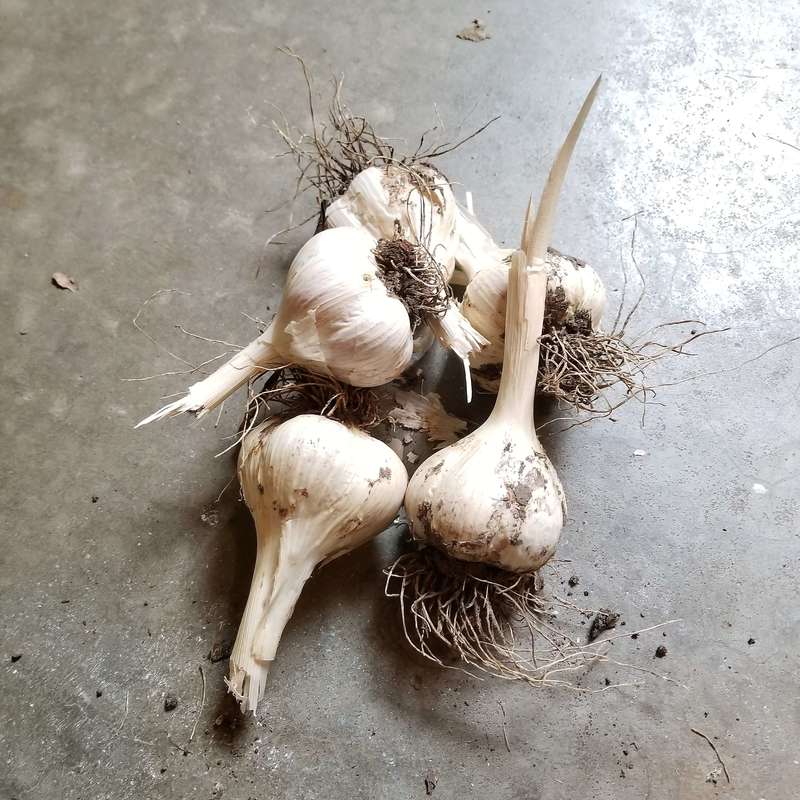
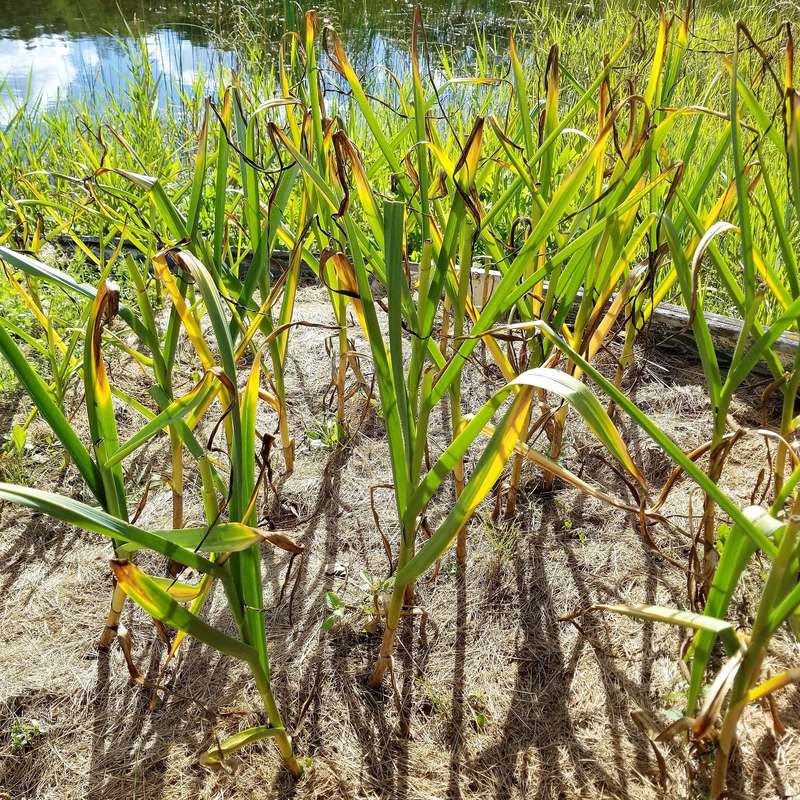
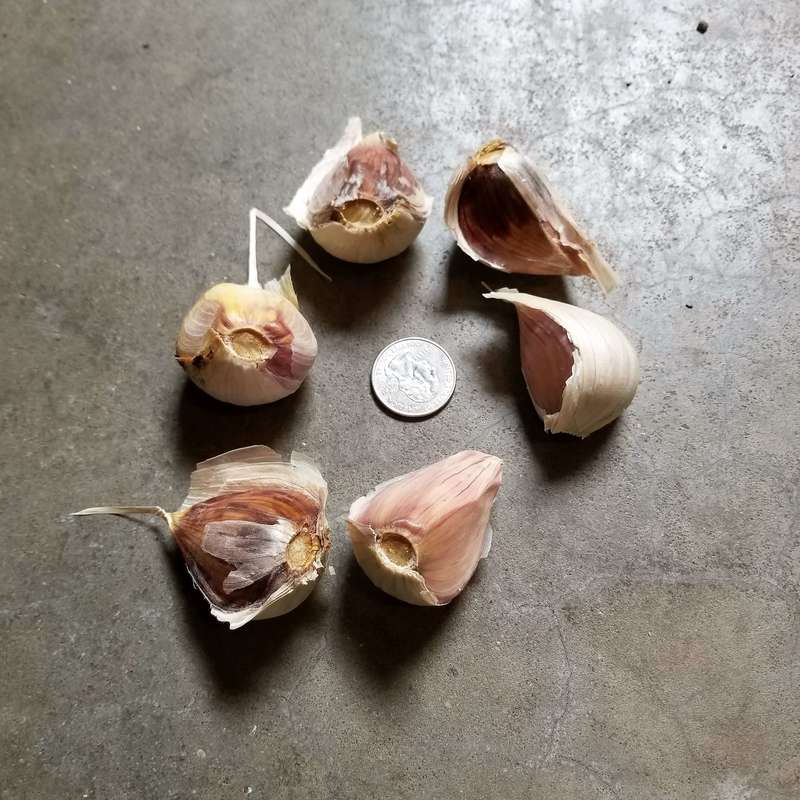
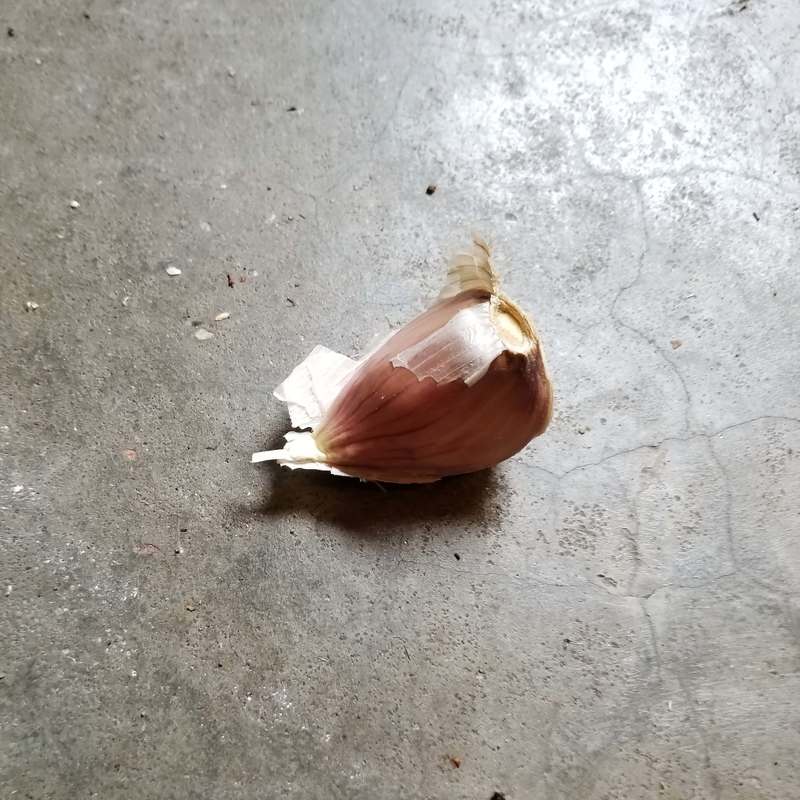
Garden Huckleberries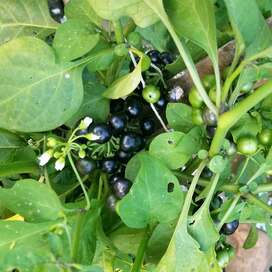 Garden huckleberries beginning to ripen. Although I was unsure about garden huckleberries as they are a member of the nightshade family and are toxic until fully ripe, I decided to try growing them in the summer of 2018. I was pleasantly surprised by the plants as they were extremely easy to grow even with a particularly difficult growing season, which included an early-mid-summer drought and mid-summer hail. However, I only needed to harvest them one time at the end of the season which is much easier than many other berries that must be picked every day or two. However, once I made and tasted garden huckleberry preserves, I became a huge fan of the little berries. Garden huckleberries are not true huckleberries (genera Vaccinium and Gaylussacia) nor are they blueberries which are a type of huckleberry in the Vaccinium genus along with cranberries and bilberries. Instead, garden huckleberries are scientifically known as Solanum scabrum, a member of the nightshade family. Garden huckleberries are generally grown as annuals, and as such are one of the fastest ways of cultivating fruit. You do not need to wait 3-5 years to start harvesting fruit like many of the fruit trees and bushes that are more commonly available. Also, garden huckleberries do not take up tons of space in the garden but, do plan to allocate space similar to a tomato plant. Although nightshade plants can be very scary due to their well-known toxicity, many of our commonly grown crops are in the same nightshade family, including tomatoes, peppers, eggplant, tobacco, and potatoes. The biggest obstacle I had growing garden huckleberries was not being able to tell when they were fully ripe. I live in Wisconsin so our growing season (zone 4) is relatively short. Although garden huckleberries have only 75 days to maturity, I still found that many berries did not completely ripen before our first frost which is usually around the end of September, even though they had significantly more than 75 days to mature. I also started them from seed inside before transplanting at the end of May to give them even more time to mature. Many berries ripened to a black color throughout the summer and supposedly once they turn black and glossy, if you wait 2 more weeks, they will turn a dull black color indicating they are fully ripe and also no longer toxic. However, I found that the berries ripened at different times and it was too much work to try and pick out just the ripe ones. However, these are tough berries and generally do not get overripe so I decided to just let them on the plant until the fall. A mild frost is also supposed to enhance their flavor as well so this was another reason to wait. I finally harvested the night before our first “hard” frost. Literally, my family, including my in-laws, ran out to the garden in the dark using our car lights to see, and harvested all the berries before they froze. The hardest part of this whole process actually occurred after harvest. I spent a long time sorting ripe from unripe berries and making sure all the stems were removed. Some berries may look fully black but still have a tinge of green and if you cut them in half you will find the inside has not yet changed color. I threw out any berries that I could tell were obviously unripe. Since fall/early winter is crazy for my business I decided to just wash the berries and freeze them on a baking sheet before transferring them to freezer bags. I then forgot about them until January when the worst of the holiday rush was done.  Garden huckleberries ready to freeze. Once I had more time, I decided to try making garden huckleberry preserves. I am a huge fan of Tyrant Farms so I decided to use their recipe. These are not well-known berries and there is not a ton of information out there about them. However, one of the keys to these berries is that they must be cooked for their flavor to develop. If you eat them unripe, they are toxic, if you eat them ripe but raw, they should no longer be toxic but they really have no taste or maybe a slightly bitter taste. Trust me, you will not want to pop another one in your mouth. However, as I found out after tasting the cooked preserves, they taste absolutely delicious. The flavor is somewhat like blueberry jam. Some recipes recommend cooking them with baking soda to remove bitter flavors, but I found this was not necessary at all. Just make sure you are using fully ripe berries. A long cooking time is recommended as the skins are very tough, slightly leathery, and the berries can be hard to pop. Although I did follow the recipe and canned the preserves, the pH of the berries is unknown and the safer option is to make freezer jam instead of canning it. After making a batch of the preserves, I still had several pounds of berries remaining in the freezer so we decided to try making some garden huckleberry wine (yum!) which will be the topic of my next post once we get it bottled. All About DucksIn the interest of full disclosure, I have only been a duck owner for about 6 months so if you really do want to learn all about ducks please read a much more thorough source such as Dave Holderread’s book “Storey’s Guide to Raising Ducks.” However, I would like to cover several key pieces of information about being a duck owner, preferably before you take the plunge into duck ownership! As of this publication, we have 7 ducks that are about 26 weeks old. We chose our ducks mostly based on their egg-laying ability and purchased six females consisting of three different breeds and one lucky Pekin male. The following are 10 helpful tips about ducks. 1. Ducks Love Water I know this seems very obvious, but until you have had personal experience watching ducks around water it is hard to convey how much they truly love water. We introduced our ducks to water around 4 weeks old while under supervision. It is possible for ducks to drown or get too chilled from the water when young so always watch them carefully! Our ducks immediately took to water, well, like a duck to water! Although ducks do not “need” swimming water, they do need drinking water deep enough to wash out their nostrils and to help wash down their food. You can provide ducks with swimming water occasionally via a kiddie pool, however, it is much easier if you have a large enough pond for them to swim on as this eliminates the need for frequent water changes. Kiddie pool water stays clean for all of about two seconds! Ponds, however, also present their own set of challenges, which I will cover below (point #6). 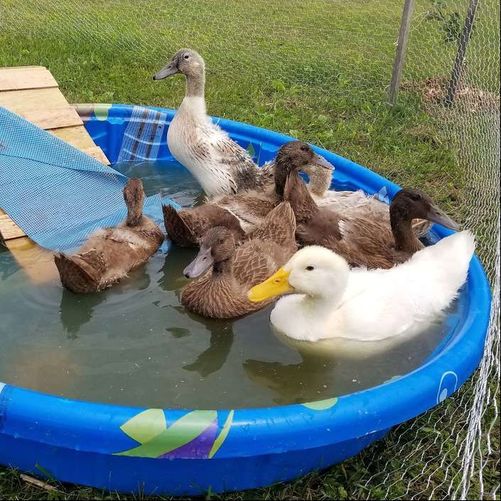 The ducks enjoyed the kiddie pool before we released them on the pond. 2. Niacin Supplementation Really Is Important One of the biggest challenges of keeping ducks is that it can be hard to find duck-specific food. Therefore, most duck owners end up feeding their ducks either chicken food or an all-flock type food. However, one potential problem with this is that most chicken feeds do not have enough niacin (a B vitamin) for proper duckling leg development. This a bigger problem with some breeds than others depending on their specific nutritional needs and how quickly they grow. In general, all ducks grow very fast, faster than most chickens, and this is reflected in their food quality and quantity requirements. We did not begin giving niacin supplements with our ducks immediately but we did offer sweet peas (the bagged frozen kind from the grocery store) which are high in niacin. We also offered a mixed food of chick starter and all flock starter assuming the all flock would be higher in niacin as it is formulated for chickens, ducks, and turkeys, the latter two which have higher niacin requirements. If you want to know the actual concentration of niacin in a feed you generally have to call the manufacturer. However, at about 4 weeks we noticed our Pekin duck who was growing the fastest, was having difficulty getting up and walking. So, we began supplementing with niacin pills that we crushed into their water (100 mg/gallon). It is important that the niacin pills are straight niacin or niacinamide and not the flush-free niacin which ducks cannot metabolize. This can be hard to find so we ended up going to our local independent health food store. When we did not see any improvement within a few days we also started supplementing their food with nutritional yeast (brewers yeast is also a good option) as yeast is high in B vitamins. We now use livestock yeast from our local feed store which is not as concentrated but can be purchased in 50 lb bags and is much cheaper. We use roughly 1 cup of livestock yeast for every 10 cups of food. Last, we bought a B complex supplement available at our local vitamin store in an eye dropper form and dosed just our Pekin with a half dropperful per day (~10 mg). Since niacin is a water-soluble vitamin you do not really need to worry about overdosing. Additionally, as any duck owner knows, the majority of duck water ends up on the ground and much of the yeast supplement ends up in the bottom of the food bowl. It took about a month of intense supplementation before we started noticing a big difference in Pekin’s ability to walk. At the same time, we also introduced our ducks to swimming water so Pekin in particular could get some exercise without hurting his legs further. Now our ducks spend most of their time in the water but even on land Pekin walks great, although he always lags behind the smaller duck breeds just due to his greater size and weight. 3. Ducks Love Treats This may also be an obvious statement (who doesn’t love treats?) but ducks are very food motivated and love treats! This is a great tool for training as they are not the quickest learners (see the point below). However, ducks can easily become overweight so choose treats wisely, and sparingly. Bread and other bread-type products are very bad for ducks and provide little nutritional value! Our favorite duck treats are peas, cherry tomatoes (cut in half), and most greens which may or may not be nutritionally good for them depending on the type (iceberg lettuce vs kale). Peas are great because you can buy them frozen and never worry about seasonality and not having them on hand (winter in central Wisconsin limits our choices!). We also give scratch grains occasionally but these are not nutritionally complete so should never be given in excess of 10% of their diet. Scratch grains are great for the winter however, because they are easy to keep on hand and the extra carbohydrates help keep the ducks warm. 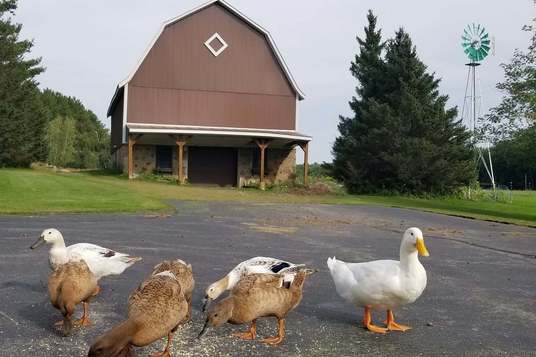 The ducks enjoy a treat of scratch grains. 4. All Ducks are Not Created Equal There are a large number of duck breeds to choose from, although not as many as there are chicken breeds. We made our selection based mostly on their egg-laying ability. Our first duck began laying at 20 weeks and a second started at 21 weeks. We are now up to 4 eggs per day so still have two ducks that have not begun laying. As we are quickly approaching winter in central Wisconsin (mid-November), they may not begin laying until Spring which is fine for us as 4 eggs per day is more than my family of three needs. We chose to purchase our ducks from Metzer Farms as they have a good reputation and offered all the types of ducks we were interested in. We put in an order for 10 ducks to avoid a small order fee but split that order with a friend. We ended up with two female Golden 300 Hybrid, two female Khaki Campbell, two female Welch Harlequin, and one male Pekin. They are all supposed to be relatively calm ducks, except for the Khaki’s which have a more nervous disposition and they are all great to good egg layers. All of our ducks seem relatively nervous to me but that could also be due to the fact that we have an energetic 6-year-old (enough said!). Other than egg-laying ability and disposition, we have also noticed other differences among the various duck breeds. The biggest difference is intelligence. Although no duck is going to be in the running for smartest bird (I think they depend more on instinct) we have noticed that the Khaki Campbell’s are clearly the smartest. They are the first to learn new routines, the first to master going up and down ramps (Pekin and the Welchies never really did learn before we let them loose on the pond), and usually the first to come into their house at night (although this may be more food motivation than actual intelligence). It is not unusual for Pekin and the Welch Harlequin’s to get confused leaving their house in the morning. If the other ducks beat them out of their run they sometimes try to walk through the fencing, the most direct route to the rest of their flock, rather than go through the door. Decide what traits in ducks are most important to you before falling in love with a specific breed. We really wanted runner ducks because they look awesome (think wine bottles with legs) but they are notorious for their nervous disposition. With a small child this duck breed was not a good choice for our family. 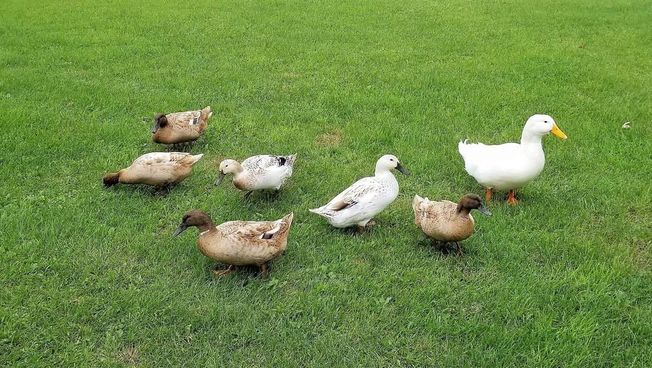 There are a large number of duck breeds available. We have two Golden 300 Hybrid (front and back left), two Khaki Campbell (the other two smaller tan-colored ducks), two Welch Harlequin (lighter ivory-colored ducks), and a large male Pekin duck (note his curly drake feather). 5. Ducks Love Each Other Ducks are flock animals. They love/need to be around other ducks so you should never get just one duck. They also get really stressed if they are separated from their flock. So be sure you plan a duck house for a flock of ducks, at least 2-3 ducks. Additionally, if you decide to get a male duck (a drake), make sure you have enough females. Depending on the breed, a single male usually needs 4-8 female ducks, otherwise he can actually hurt or even kill the females from overbreeding! 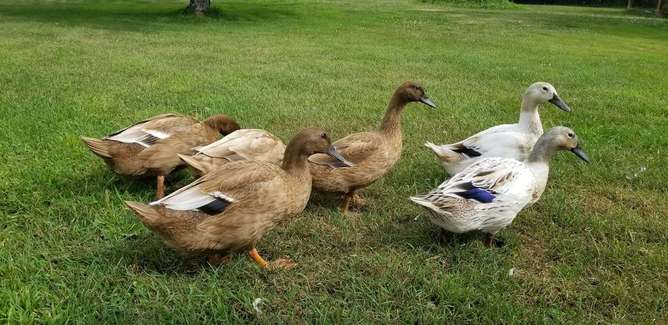 Ducks love to flock toghether and will follow each other around, rarely straying too far from each other. 6. To Pond or not to Pond There are many duck owners who do not have ponds and there is nothing wrong with this as long as you provide fresh water daily and if possible occasional swims in a kiddie pool or something similar. We have a large pond so it was an easy decision to get ducks (no hauling water or cleaning out a kiddie pool). However, ponds do come with their own challenges. The biggest obstacle we have faced is getting the ducks off the pond at night. This is where treats and proper training come into play. Our ducks slowly became adjusted to our pond and over several months explored the shore of the entire pond and also cleaned out a lot of the muck and weeds. However, one night the ducks decided they no longer wished to come off the pond. This happened around 17 weeks when there was plenty of forage for them on the pond and they began to become sexually mature and our male Pekin got his drake feather (a curly feather at his tail that only male ducks get). So, we spent 1-2 hours trying to encourage our ducks back into their house, which involved my husband paddling around the pond in a canoe after dark. After this we decided to only give the ducks treats on land, near their house, and withhold their food from them during the day. They now get fed at night and in the morning but very limited treats and food during the day. This method has worked well although it is not foolproof. If we have a day or two where they give us difficulty coming in off the pond, we keep them in their house/run for a few days so they re-associate it with home, which helps re-train them. I am hoping once the pond freezes this winter, they will also be less inclined to stay out at night. 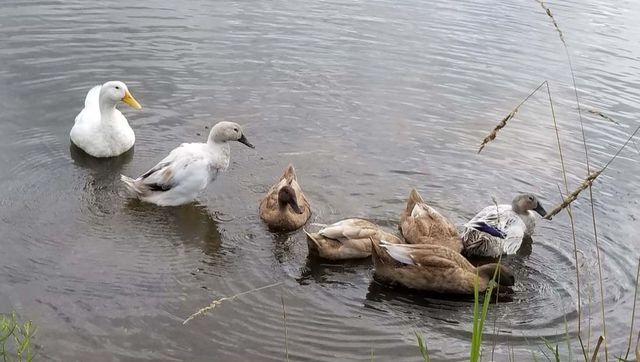 The ducks love to explore the the pond and take their daily bath. 7. Ducks Love Routine If you want to train ducks, for example, to come into their coop at night, use a ramp, or use a certain door, you basically need to keep the same routine for 1-2 weeks or even as long as two months. They are not the fastest learners and treats go a long way in helping them learn a routine. We are currently transitioning our ducks to a new duck house with a larger back run. For their first 6 months we had them in a chicken/duck tractor which we moved every few days but this seemed to stress out and confuse the ducks, even if it only moved a few feet. Since we wanted a permanent coop with a larger secure run where we could leave them overnight or even for a weekend without worrying, we decided build one this fall. We moved the ducks into their almost complete new coop/run about two week ago. We kept them enclosed and off the pond for the entire first week so that they will associate their new coop with home and will follow us back into the run every night using treats as motivation. Although there was some confusion the first time we let them out they did return to their new coop quite easily using peas as motivation. 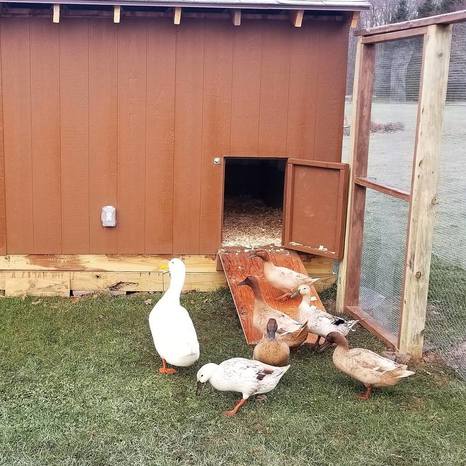 The ducks enjoy their new coop and back run and learned very quickly to use the ramp. 8. Duck Eggs Taste Delicious We were a little nervous about getting ducks for eggs since we had never even eaten duck eggs. Sometimes eggs can have off flavors if the ducks derive a large portion of their nutrition from a pond. Since our ducks spent the entire summer on the pond, cleaning out the muck and water plants, we were definitely hesitant about trying our first egg. Of course, like all free-range poultry the yolks were a much darker orange than commercial eggs. The eggs are also much harder to crack, their shell is thicker, and the membrane inside is tough to puncture. The yolks and whites are much firmer as well which makes them harder to scramble. Duck eggs also generally have bigger yolks and smaller whites compared to large chicken eggs and their eggs tend to be larger as well depending on the breed. However, the eggs themselves are delicious, they tend to be creamier than chicken eggs, likely due to their larger yolks, which makes bakers love them. Overall, there is no reason to avoid duck eggs and many reasons to try them. One caveat is that you can be allergic to duck eggs and not chicken eggs, but the reverse is also true and some people allergic to chicken eggs have found they can eat duck eggs!  Comparison of two free-range duck eggs versus a commercial jumbo chicken egg. 9. Ducks are Cold Hardy When we were deciding whether to get egg-laying chickens or ducks one of our biggest considerations was weather. We live in central Wisconsin and although there are many colder places in the US, this is by far the coldest place I have ever lived. Although there are several hardy chicken breeds, ducks are better at dealing with cold and wet climates. Chickens will not generally go out into the snow or rain, but ducks not only go out, they absolutely love it! We live in Zone 4 so it is not unusual for winters to get at low as -20 to -30 °F with wind chills. Although ducks still need a good shelter to protect from both predators and the weather, they are much better equipped to deal with cold weather than are chickens. 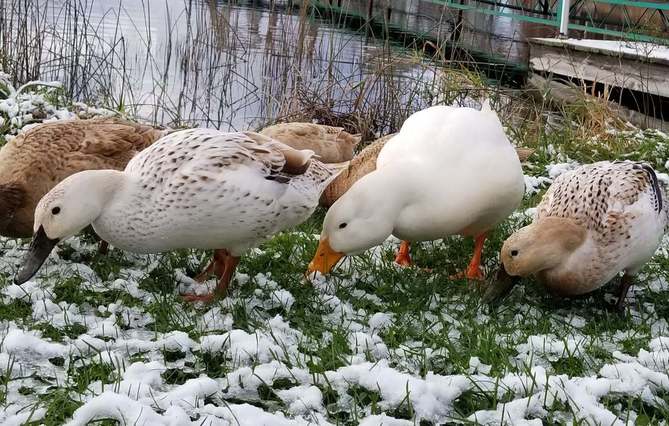 The ducks first snow in mid-October. Winter started early this year! 10. Ducks are Highly Entertaining My last point is that ducks are highly entertaining! Yes, they can be frustrating to train. Yes, they are much messier than chickens (although significantly less messy when free-ranging on a pond). Yes, they can be stubborn. Yes, I have gotten extremely frustrated when it is dark outside and they will not come off the pond after trying for 2 hours to get them back on shore. But ducks are super fun which makes up for everything else! They, will follow you around if you have treats, or they think you have treats, they talk to each other constantly, they love playing in water, mud, or snow, and if you get them as ducklings, they just might be the cutest animals ever! 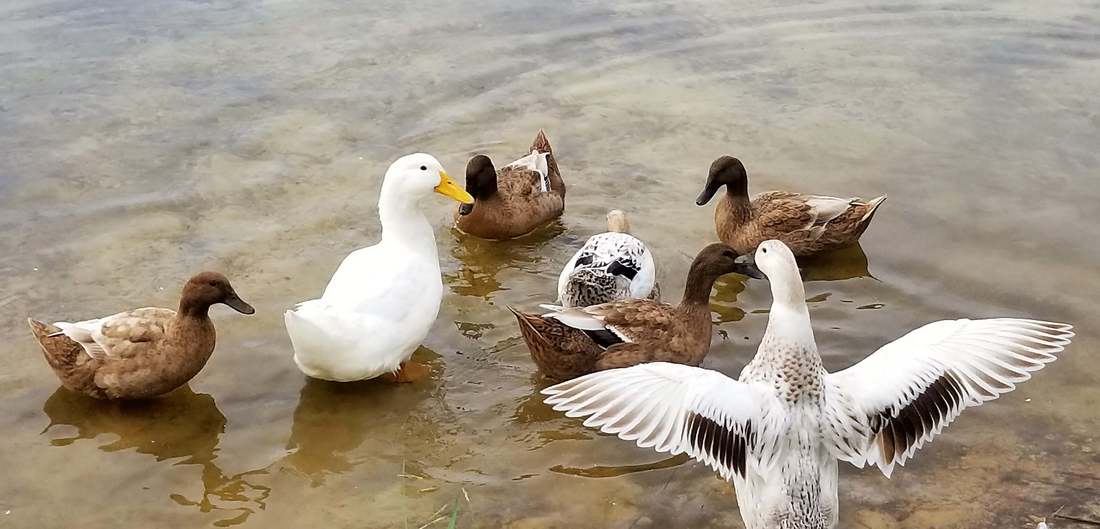 Interview with Live to SustainWe were recently interviewed by Laura Weatherbee and Adam Cunningham from Live to Sustain. Adam and Laura are interested in living a more sustainable lifestyle and were curious about sustainability from a food perspective. In this interview Matt and I open up about our motivation for leaving the New York City area and what we have been up to since we bought our farm in Wisconsin. You can listen to the podcast interview here and also follow them on their website, as well as Facebook, and Instagram. Thanks for listening! Marisa Growing Great GarlicGarlic is one of my favorite plants to grow, mostly because it is very easy to maintain and I love to cook with garlic. Like many bulbs it is best planted in the fall, however you can also plant in the spring, the bulbs just may not grow as big. Growing garlic is easy and requires minimal upkeep. As long as you keep weeds down with mulch you can plant it and forget it. It is also insect-resistant, disease-resistant, and deer-resistant which is a huge plus. Home-grown garlic also tastes much better than store-bought which may be months old. Home-grown bulbs and cloves are often twice the size of those in the stores. Most garlic does keep well however, so there is nothing wrong with storing it in a cool dry place and using it months later. I've even heard of dicing it and freezing it although I have not tried it myself. As an added bonus, if you grow garlic that produces scapes you can harvest the scapes and use them in some great recipes. My favorites are garlic scape soup, scape pesto, and grilled scapes (see below for pictures). You can also use them as a substitute for regular garlic in any recipe. 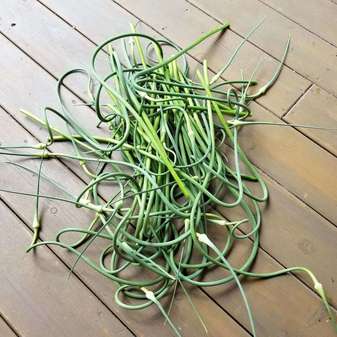 Fresh Cut Garlic ScapesCut scapes when they begin to straighten out. If you wait too long they will become woody. 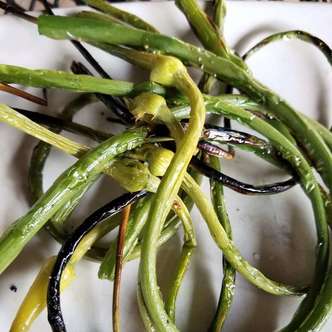 Grilled Garlic ScapesGrilled scapes were, surprisingly, my favorite way to prepare them. We drizzled them with olive oil, added salt and pepper and skewered them on a wooden skewer. Then grill them until they are tender. Delicious! 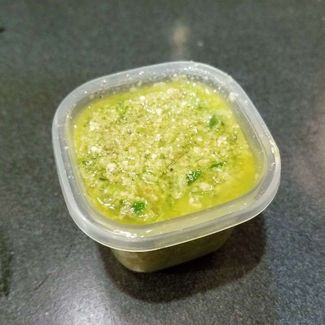 Garlic Scape PestoThe garlic scape pesto is also very good. You make it very similarly to basil pesto. I used walnuts instead of pine nuts. The scapes are milder than the garlic bulbs so I did not find it too garlicky. I have used it on pasta and chicken both straight or half and half with regular basil pesto. Both are delicious! How to Plant GarlicUsually I try to plant my garlic in mid-October. This year I am a few weeks behind due to a couple of unexpected ER visits that eventually resulted in an urgent abdominal surgery. Now that my core muscles can take a little exercise I got my garlic planted ASAP. I hope it's not too late and the cloves can still get established before the ground freezes solid. Last year I planted my garlic in a raised bed with a high-quality soil, compost, and peat moss mix. It was the best garlic I have ever grown! Raised beds allow you to control the quality of your soil and also provide good drainage which was key this spring as we had 6-8" of rain above average over a 3-month period. Our onions that we planted in the ground simply rotted. Another important element is to buy good quality garlic and make sure it is compatible with your growing zone. Some garlic types (soft neck) do better in the south but will not overwinter well where I am in Zone 4. I have had the best luck with the hard neck varieties that overwinter well. You can buy garlic from many seed companies or even your local farmer's market. Step 1: Prepare the SoilThe first step is to prepare the soil for planting. Remove as many weeds as possible and loosen it up well. Step 2: Dig TrenchesDig trenches approximately 2-4 inches deep and about a foot apart. Step 3: Plant the GarlicBreak up your garlic bulbs into individual cloves and plant them root side down about 4-6" apart. 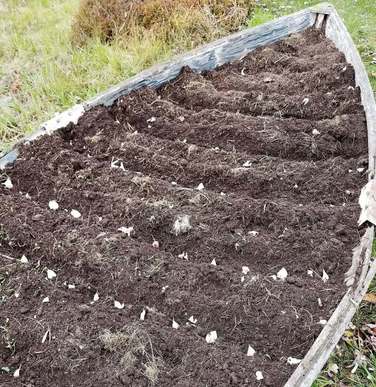 Step 4: Add SoilCover the garlic cloves with 2-4" of loose soil. 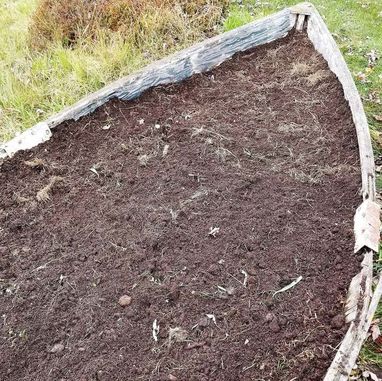 Step 5: MulchIf you live in the North you must cover them with a thick layer of mulch, usually 4-6". This will help the bulbs overwinter and can be removed or moved aside in the spring when the new plants start emerging. Most years I use leaves because they are readily available in the fall. This year I used the dead leaves and stems from our day lilies. I then usually continue to mulch, often with grass clippings, throughout the rest of the season. 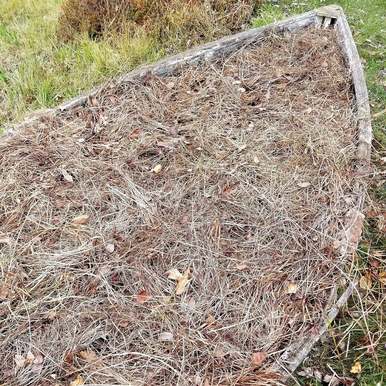 The garlic will start growing in the fall but then go dormant when the ground freezes. It generally will not emerge past the mulch layer. Last year we had an usually warm fall (I mowed the lawn in a T-shirt in November!) so our garlic grew more than normal. However, it still came back great in the spring. Once the new plants emerge in the spring you can move aside the mulch to help them and keep up on any weeding that needs done. If you keep them mulched weeding should be minimal. The next step is to keep an eye on the scapes. You have the option of allowing them to grow and leaving them on the plant. Some people promote removing the scapes when they start to uncurl so the plant puts more of its growth and energy into the bulbs. Cutting them may or may not make a difference but I prefer to cut them off just because I like to eat the scapes! You want to cut them when they are just starting to uncurl. If you wait too long the stems will start to get woody. After you cut the scapes the garlic usually grows for a few more weeks. I pick the garlic when the plants start to die off, usually around mid-July for our zone. I knock off excess dirt and let the entire plant dry in a cool, dry place, usually my garage. Once the entire plant is dried you can cut off the stem and knock off any more dirt. I separate out the biggest bulbs to save and re-plant and start eating the smaller bulbs. Different varieties store better than others but most will last for several months if stored in a dry place. Supposedly the soft-neck varieties store better than the hard-neck. Overall garlic is easy to grow and tastes great! I love roasting an entire bulb, spreading it on fresh-baked bread, and enjoying it with a nice glass of wine. Feel free to comment or message me with any questions! Now Selling on eBayUpdate: I no longer sell items on Etsy or eBay but feel free to check out my blog posts on gardening, wreaths, maple syrup, chickens and ducks, and more!
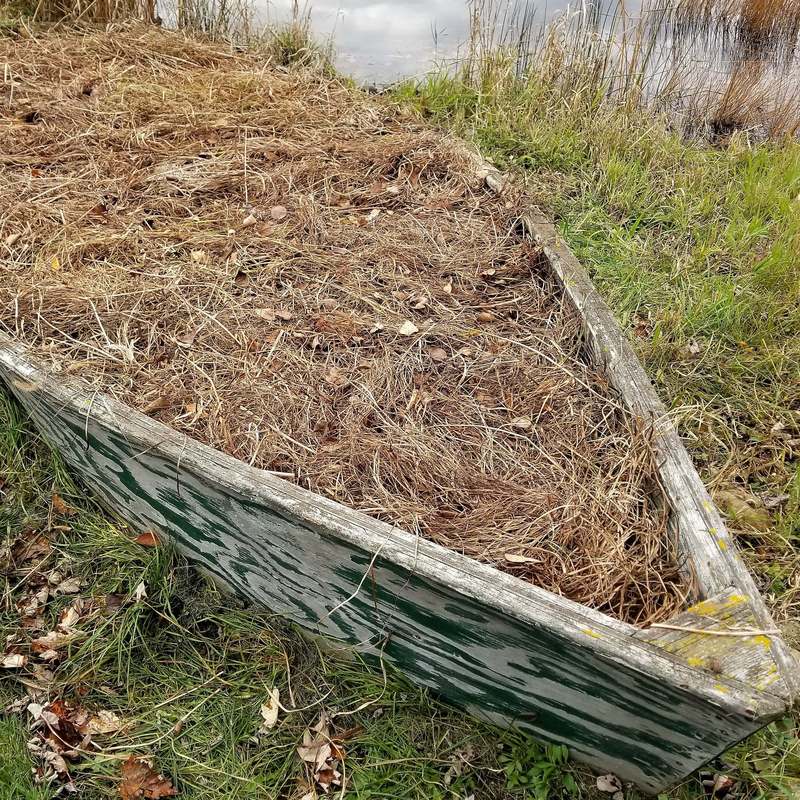
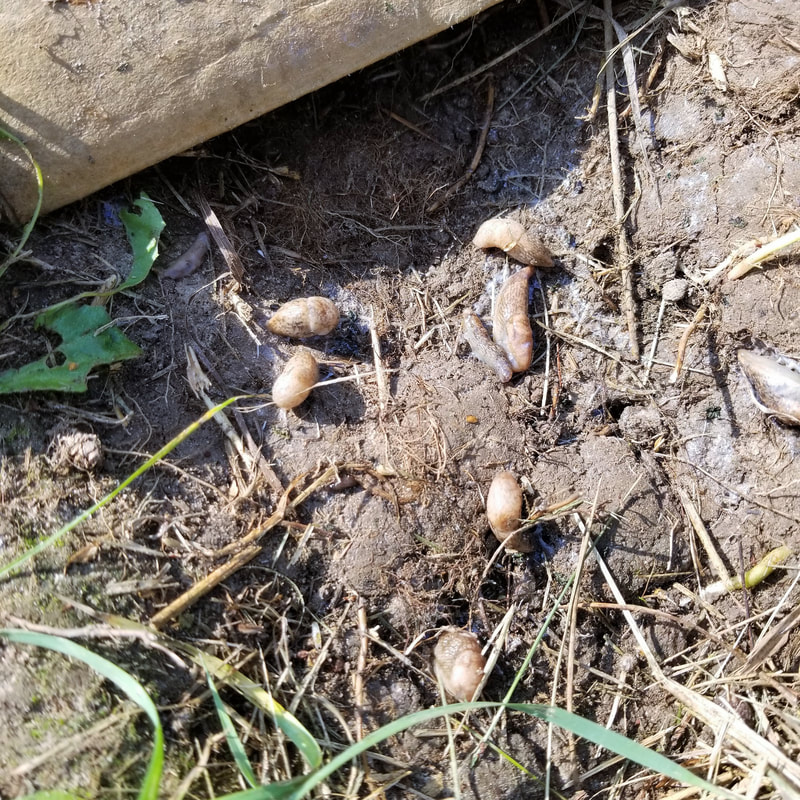
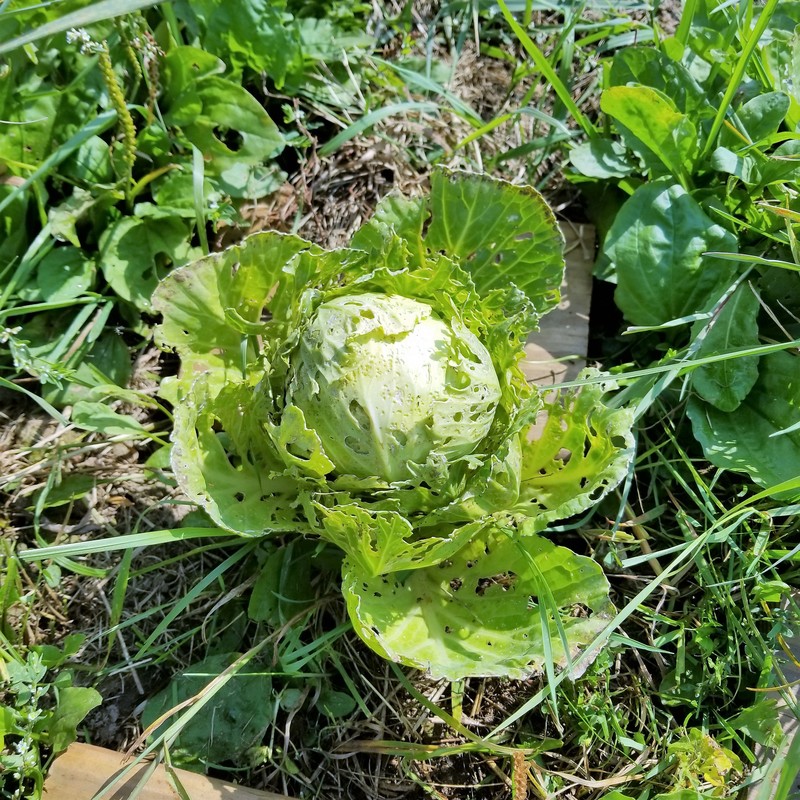
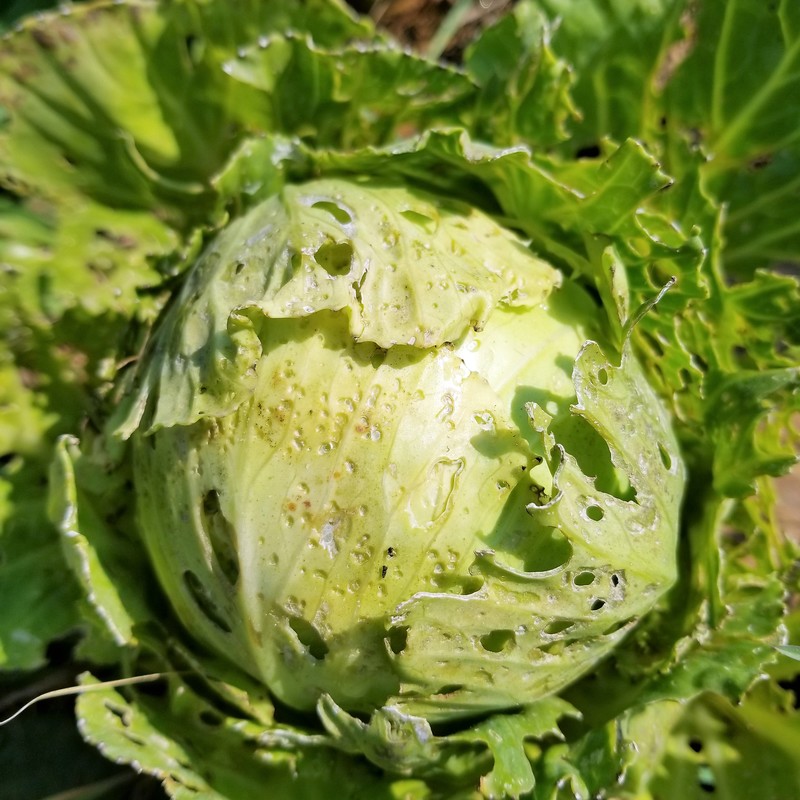
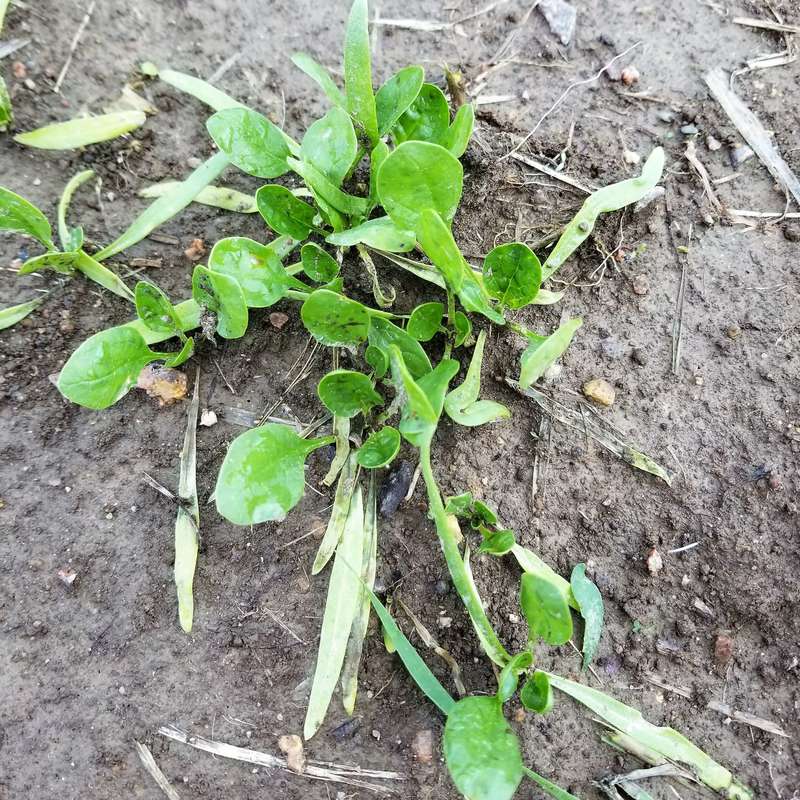
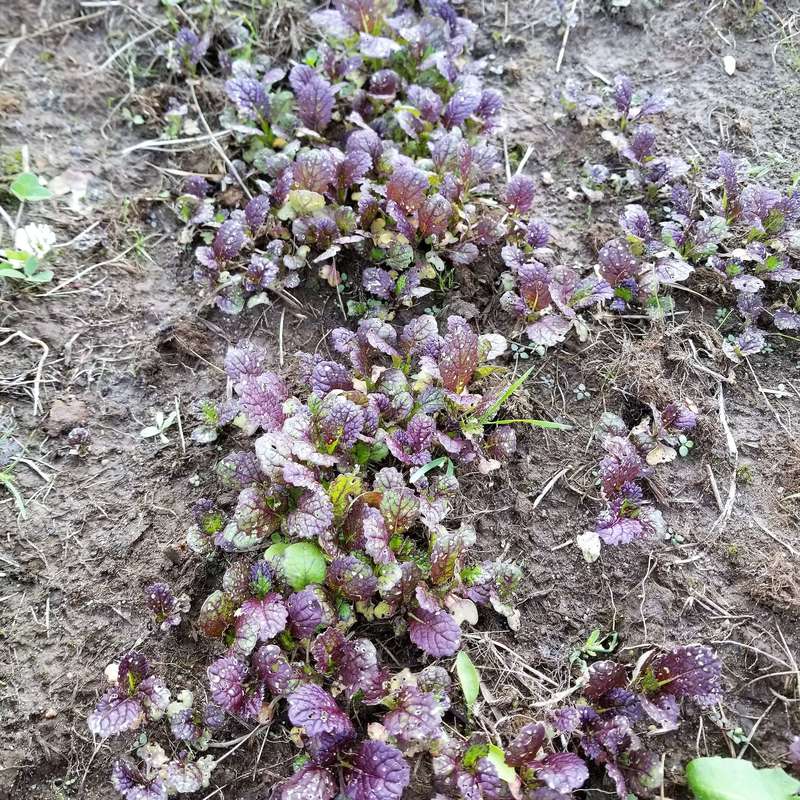
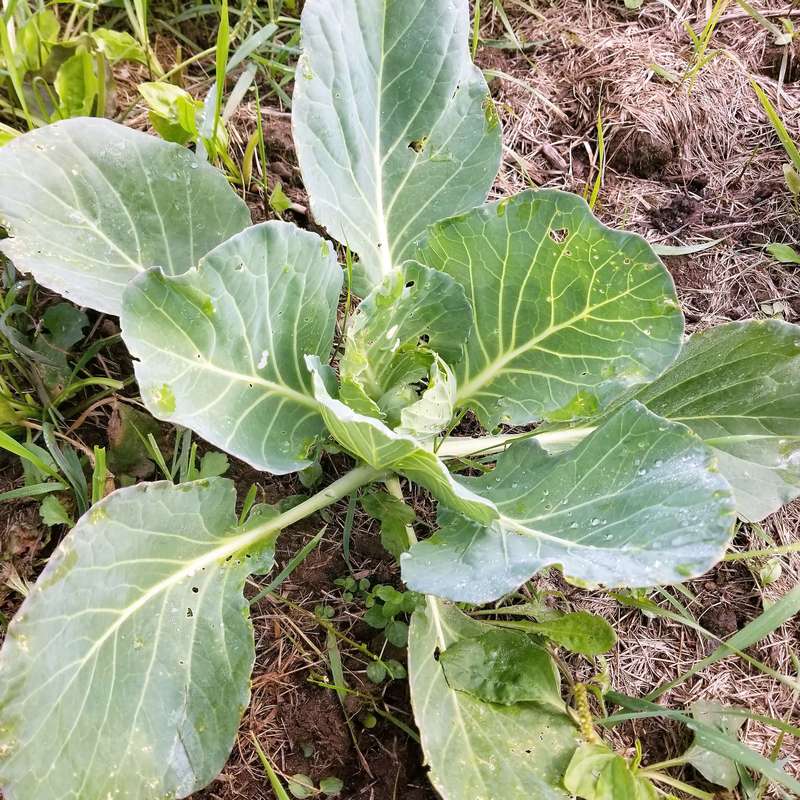
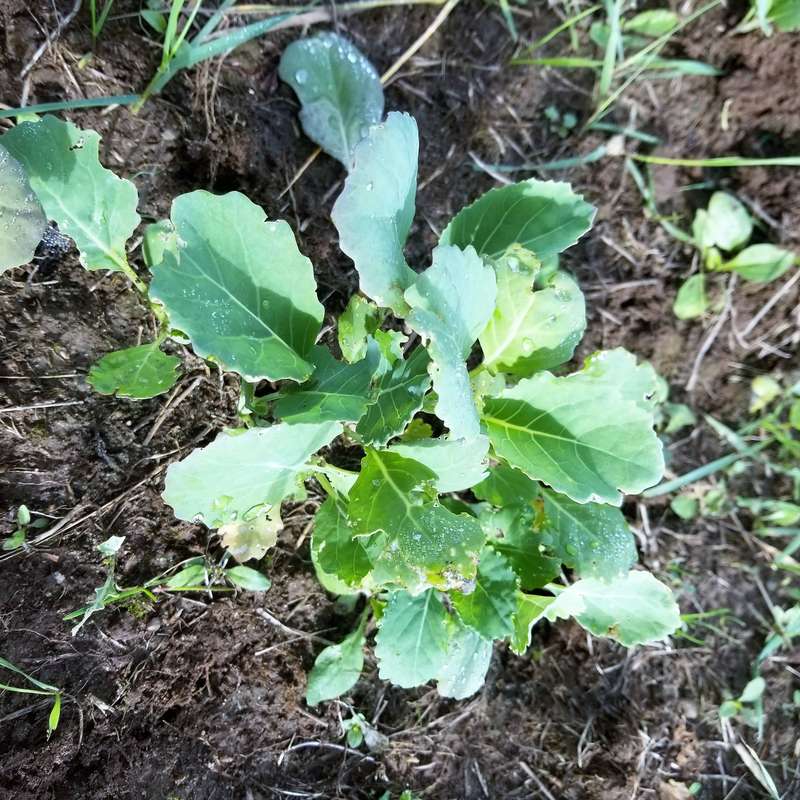
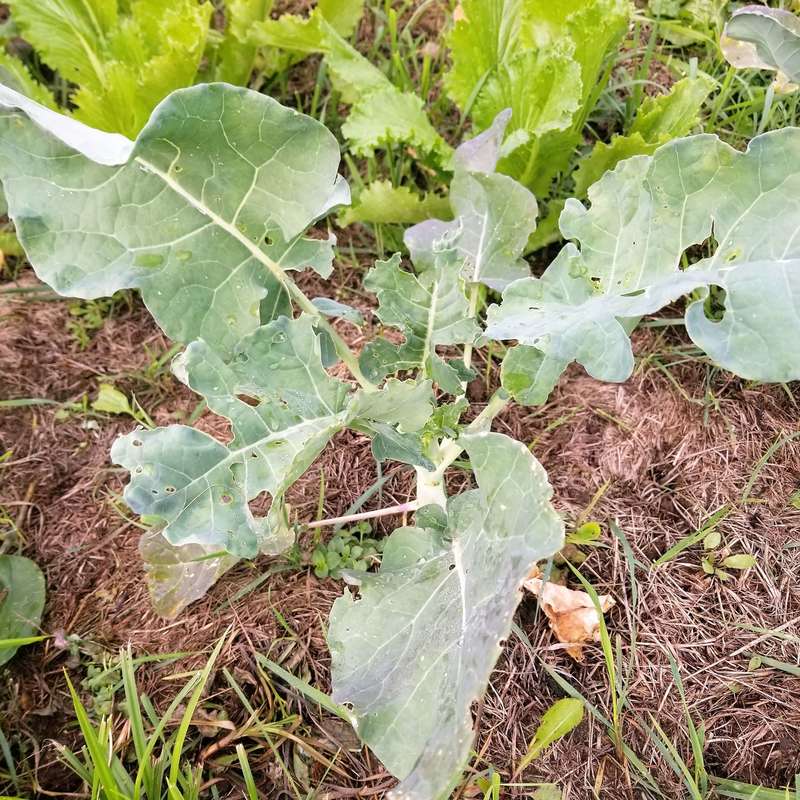
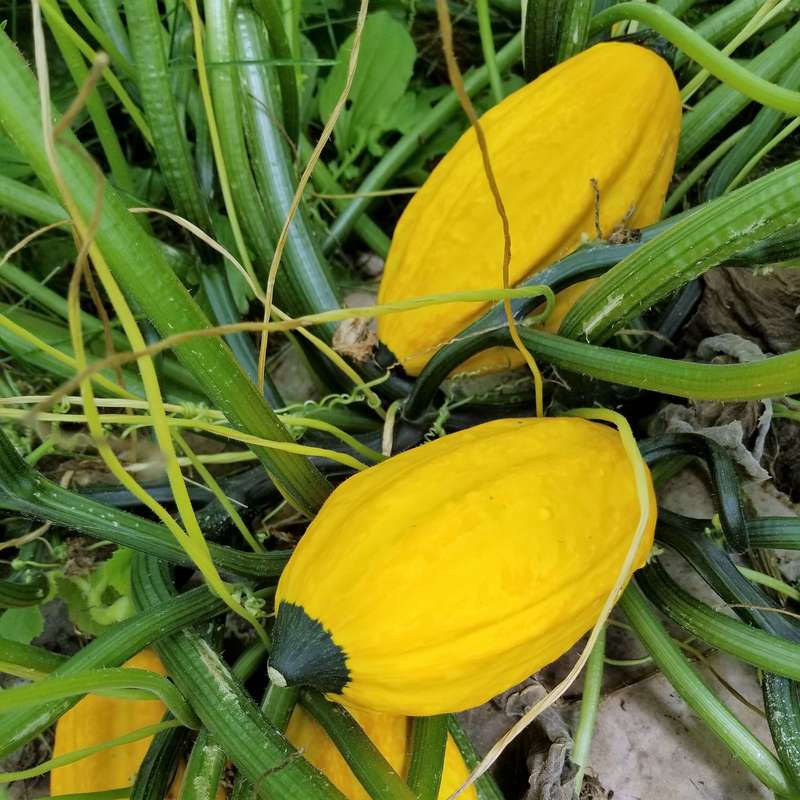
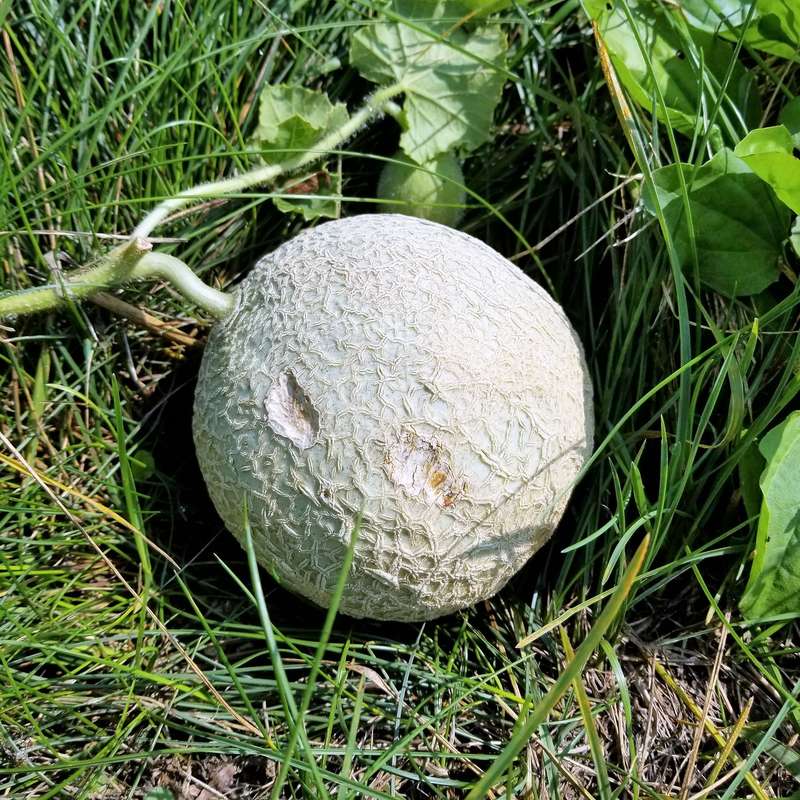
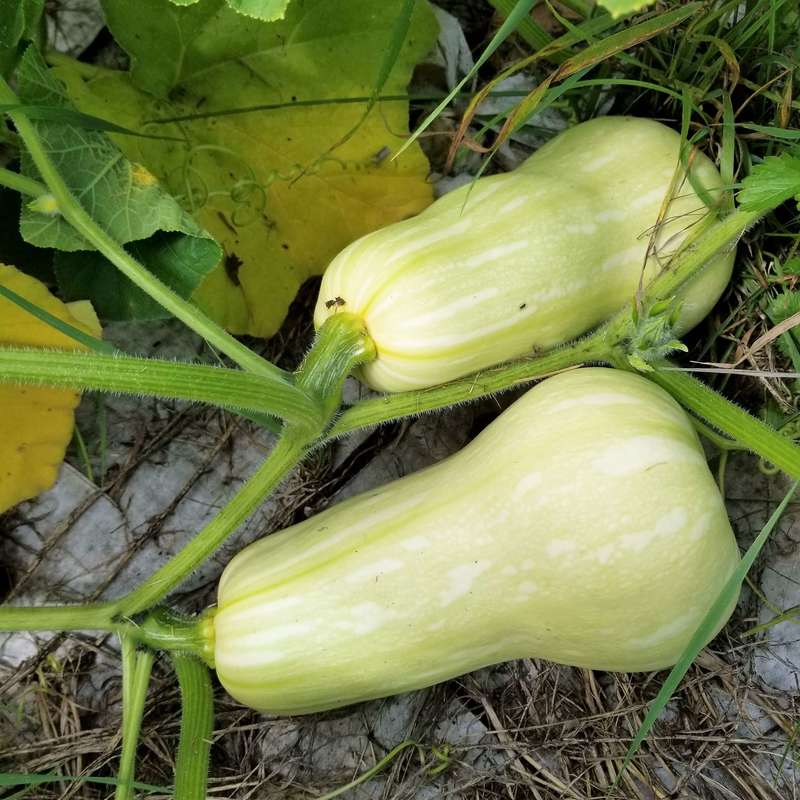
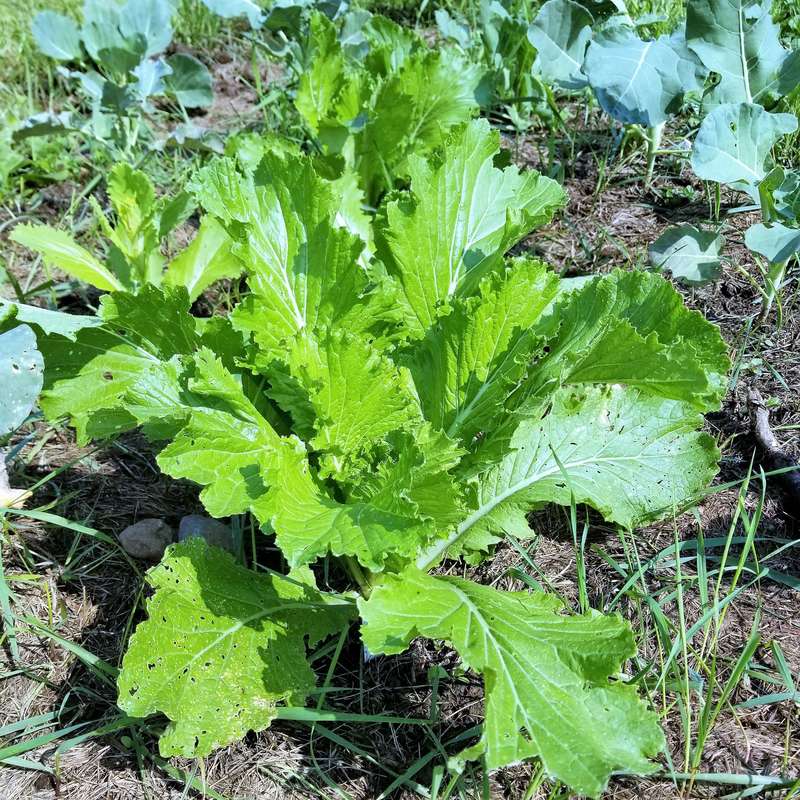
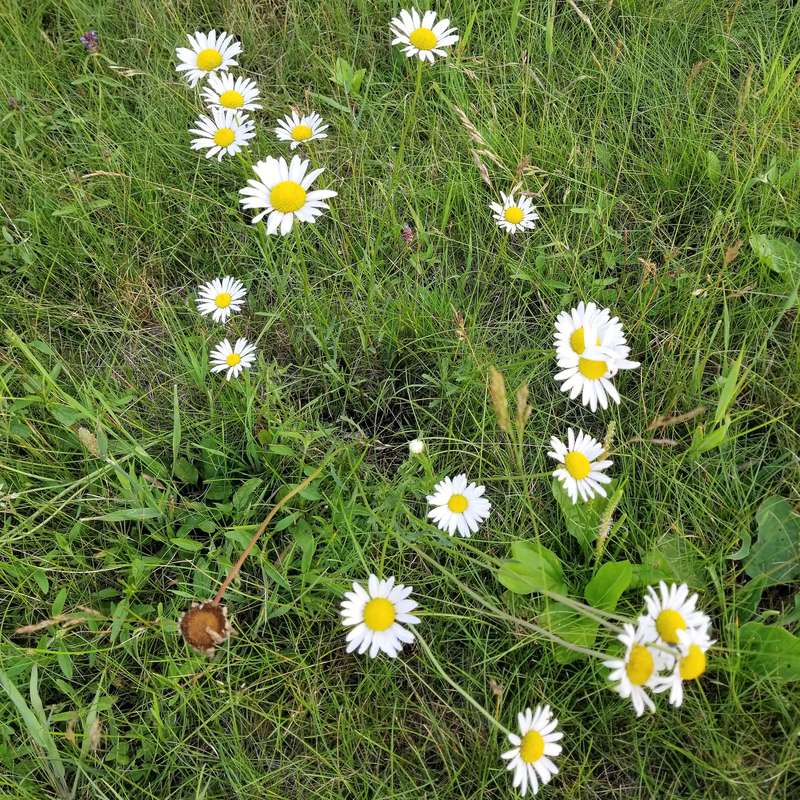
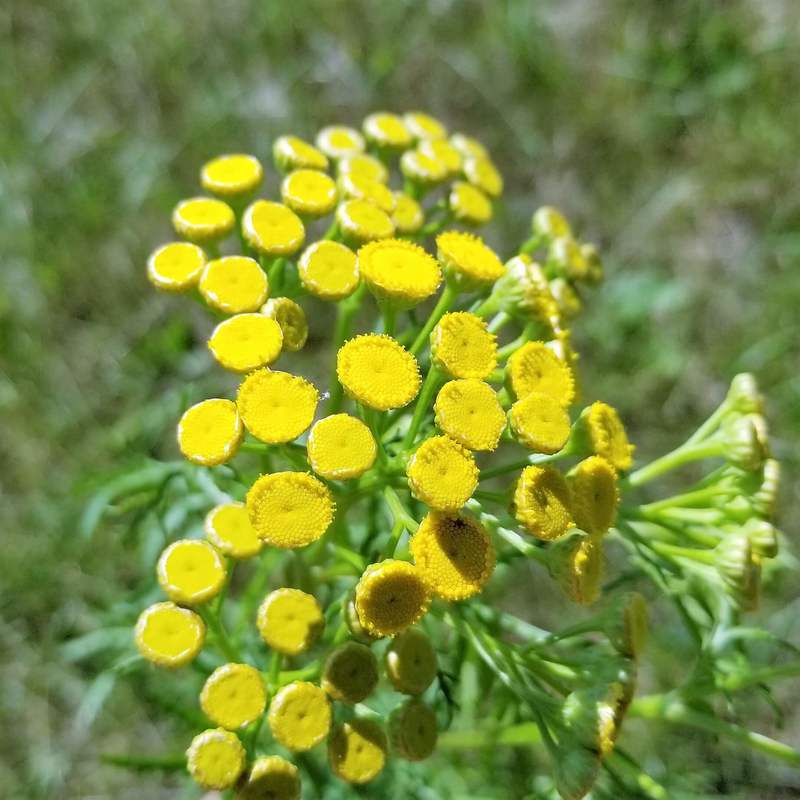
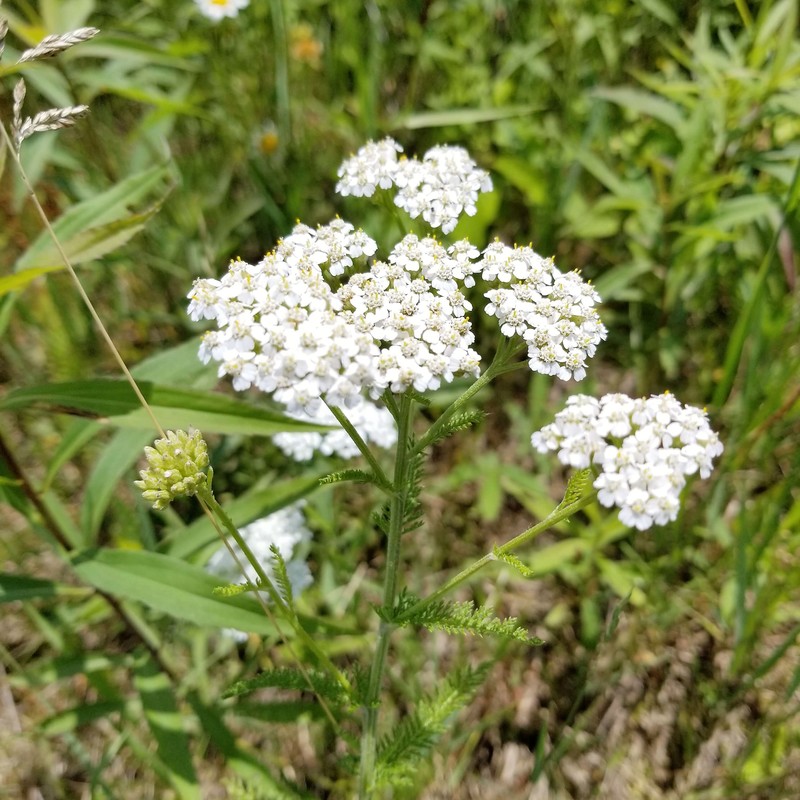
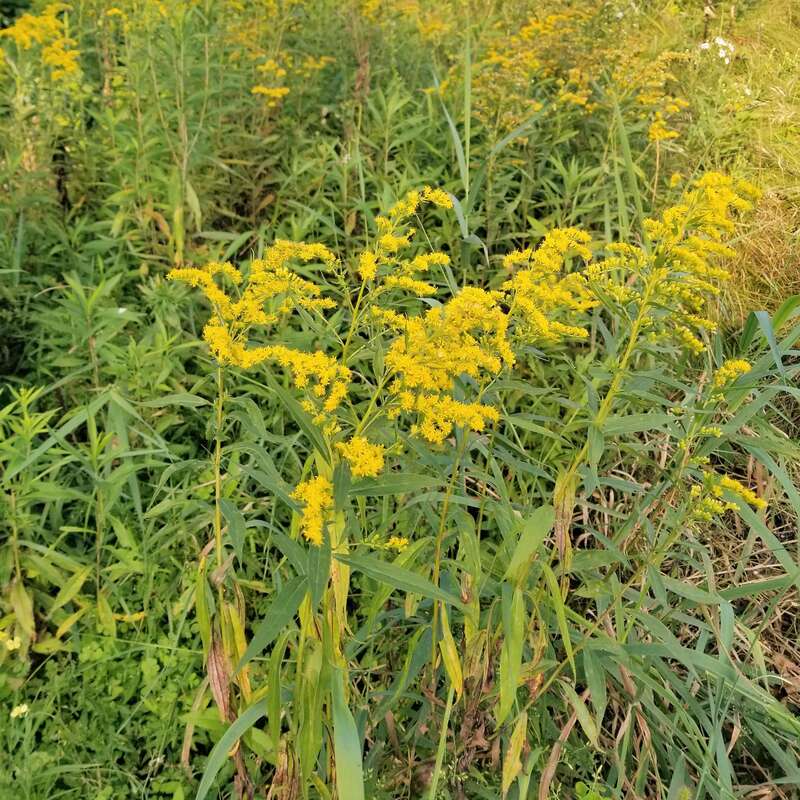
Announcement: We are now selling select items on eBay in addition to Etsy. Items such as pine cones and dried flowers which we have in excess are now available on eBay for customers who prefer the eBay platform. Please visit our shop at the link below. Thanks! Common Garden Pests (Updated in 2024)There are a ton of pests that can affect your garden. I will touch on a few that have been the biggest problems for me both currently and in the past. This year I have been lucky that we had very few bug problems. However, this is most likely because this was our first year gardening in this spot. It sometimes takes pests a year or two to find your garden. My biggest problem this year has been slugs. This may be because we had an excessive amount of rain in the early part of the growing season. Other pests that I have had problems with include potato beetles, flea beetles, squash bugs, cucumber beetles, wireworms, voles, and mice. Putting down lots of mulch or cardboard provides great benefits in weed control and retaining moisture however I have found that this increases the slug and mouse population as both tend to live under the mulch and cardboard. However, I believe the advantages of mulching outweigh any disadvantages. We set traps for the mice but insect pests can be harder to control, particularly if you try to avoid chemical control methods. I have detailed some of our biggest insect pest problems below and possible methods of control. 1. SlugsIt can be tough to know if you have a slug problem as they are not generally out during the day so they can be hard to see. However, if you find you have lots of holes in your plants particularly cabbage, broccoli, and cauliflower then you may have the slug problem. I have also found slugs on my beans, corn, peppers, and other vegetables. To determine if you have a slug problem check out your plants at night or in the early morning particularly when it is humid out. I found hundreds of slugs coating my plants this year when I went out at night. There are many methods to get rid of slugs. One of the more popular ones is beer or yeast traps. I have tried mixing yeast with some flour and water however this did not attract any slugs. But different slugs may be attracted to different baits, including the commercially available ones. I plan on trying straight beer this week to see if that is more effective and will update this post after. The take home message is if you are using a bait try different ones until you find one that works. Other solutions include chemical control methods such as pesticides or slug pellets. However, many animals such as birds and frogs eat slugs so if you decide to go the chemical route ensure that the pesticide will not affect the animals that eat the chemically treated slugs. My favorite method, which is more labor intensive, includes handpicking the slugs from the plants or from underneath cardboard or wooden boards that you lay down around your plants. Wear gloves if you don’t like the slime! If you want to pick them directly from the plants you must go at night or early morning when the slugs are out. If you mulch or lay down cardboard or wooden boards around your plants you can simply lift up these boards and cardboard during the day to look for slugs. I have collected hundreds of them by picking them directly from the plants or from the cardboard I lay down to mulch. A bonus for us is that we use the slugs as bait when fishing in our pond! Slugs hiding under cardboard mulch during the day.Damage to cabbage caused by slugs2. Potato BeetlesThe Colorado potato beetle is a huge pest for potatoes and other related plants. As this was our first-year gardening in this spot we had very few pests including potato beetles however one day I found a few adult beetles on our potato plants. Unfortunately, I did not get a picture of the potato beetles but a simple internet search should show a round, striped beetle that is fairly distinctive. I simply hand-picked the beetles I saw from the plants and thought I had won the battle! However, several weeks later I noticed our plants were getting devoured by the potato beetle larva (see picture below). Likely the adult beetles had laid eggs resulting in the larva several weeks later. The potato beetle larva are rather ugly pinkish bugs that can quickly destroy your plants. Again, I simply hand-picked the larva but they did do significant damage to some of the plants before I noticed them. You can use chemical pesticides against potato beetles but if possible, I prefer to avoid chemicals. Hand-picking potato beetles is possible as long as your number of plants are small and you keep an eye on your plants throughout the season. I have also read that due to widespread use of pesticides many potato beetles have become resistant to pesticides (University of Minnesota extension), another reason not to use them. 2024 Update: Our potato beetles eventually got so bad we stopped trying to grow potatoes. However, for the 2023 growing season we decided to try again. This time I checked the plants every day for the beetles/larvae and under the leaves for the orange clumps of eggs. This took a lot of time but we were finally rewarded with a huge crop of potatoes. Now I just need to get those wireworms under control! 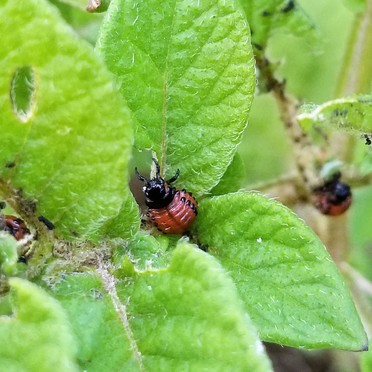 Potato beetle larvae eating a potato plant3. Flea BeetlesI had minimal issues with flea beetles this year however I have had significant issues with them in the past and I am sure I will see them in my garden in the near future. Flea beetles are tiny black beetles that jump (like fleas!) when you get near them. These beetles can be found on a wide range of plants but I have had the most trouble with them in leaf lettuce mixes, radishes, turnips, spinach, and other similar vegetables. Particularly arugula, mustard greens, and radishes tend to be devoured by them. If you find your plants have very tiny holes in them you may have a flea beetle problem. One of the most effective methods is to cover your plants early with row cover. Row cover is a cloth that allows light through but has tiny holes that do not allow the bugs to pass through it. However, I find row cover to be a pain because you have to cover your crops as soon as the plants emerge, before the bugs arrive, and remove it to harvest or weed. However, flea beetles are most active and do the most damage in spring, so once your plants are big enough you can remove the row cover and a little damage by the beetles generally will not affect your harvest. Another method I have tried with variable success is to plant another plant nearby such as mustard greens, which flea beetles love, to lure them away from your desired crop. However, I find that although this works, you are helping the population to grow more by feeding them extensively. You can always choose to treat the bait plant with insecticide to kill the flea beetles. These bugs are so small and so fast, this is one case where hand-picking them is not an option. A third, and I think best option, is to do much of your cold weather crop planting in the fall rather than the spring (see my earlier post on fall gardening) as flea beetles are mostly active in the spring. Therefore, I have many fewer issues with these beetles in mid to late summer and fall. 4. Cucumber BeetlesThere are two types of cucumber beetles. I have mostly had trouble with the striped cucumber beetle but a spotted one also exists. Both are yellow bugs with black stripes or black spots. These beetles eat cucumber plants but also squash, melons, and other related plants. The striped beetles overwinter and emerge in early summer and can completely destroy young plants. The spotted beetles do not overwinter and so they tend to arrive in later summer and cause fewer problems. I did not have problems with either beetle population this year, likely because my garden is new and they haven’t found it yet. But, in the past, particularly in community gardens, I have had to replant my cucumbers and squash because the first round was completely eaten by these bugs. In addition to eating the leaves they may also eat the flowers and fruit. The striped beetles will also transmit bacterial wilt disease to your plants so it is important to monitor your plants for any infestations. The best way to control these beetles is with an insecticide but if possible use a “natural” insecticide that is less likely to kill good bugs such as native ladybugs that feed on aphids. Neem oil is a popular “natural” insecticide although in general it will not be as effective as a non-plant based one. Another alternative is to plant cucumbers or squash plants early in the season a couple weeks prior to planting your actual crop. Also plant these a little distance away from where you plan to plant your actual crop. These early plants will attract any beetles to them. Then hand-pick or treat these plants with insecticide to kill the beetles. Also, never apply any insecticide when your plants are flowering as this will also kill any honeybees that are attracted to your flowering plants. For more information on cucumber beetles and other pests, I have found that the University of Minnesota extension has a lot of good resources. 5. Wireworms I Wireworms, the larvae of the click beetle, have become a big problem for me. They live in the soil and eat roots, this means they can affect any plant but are particularly troublsome for root vegetables, like radish, turnips, potatoes, etc. I also have a problem with wireworms eating the roots of my cold crops like cabbage, broccoi, and cauliflower. If I find a plant that has suddenly wilted in my garden I pull it up and usually there are multiple wireworms eating the roots. I tried using beneficial nematodes which are supposed to help destroy the wireworms and this seemed like it was effective the first year I used it but upon subsequent years I did not notice a benefit and my wireworm problem became worse than ever (I dug over 100 of them out of my garlic raised bed). Another method of control is to trap the wireworms using a potato. So last year (2023) I made about a dozen potato traps by cutting potatos up into approximately 2 inch pieces and piercing them with toothpicks or wooden skewers (I used the ones for cooking). I prefer the skewers because they are bigger and more sturdy. I then tied a piece of marking tape to the end of the skewer so they were easier to find in the garden. You dig a small hole just a couple inches deep and put the potato in the ground with the tagged end of the skewer poking out. Every few days I would dig them up and check for wireworms eating the potato. I collected anywhere from a few to several dozen wireworms in a day. I am hoping that if I continue to use wireworm traps in my garden I can slowly reduce their population. I find that these traps are much easier to use in my raised bed because they are easier to see versus in my main garden where the foilage quickly covers the traps making them less visible. 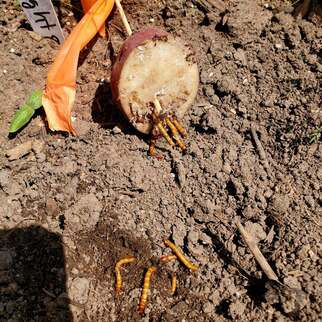 A wirewrom trap using a potato piece that collected over a dozen wireworms in one of my raised beds. ConclusionThere are obviously many more insects that cause problems in gardens as well as bacterial and viral diseases. In the future I hope to expand more on these topics. If you have any questions or comments please feel free to contact me or comment below. Fall GardeningFall gardening is a great way to extend the growing season and eat fresh vegetables into the fall and sometimes even the winter. Fall gardening also has several other advantages over the traditional spring/summer garden. One big advantage is that there are significantly fewer insect pests around to destroy your crops. Another advantage is you don't need to worry about summer coming on too quickly and your plants bolting too soon. For the northern garden, some of the best crops to plant for a fall garden include lettuce, broccoli, cabbage, spinach, mustard greens, kale, chard, peas, cauliflower, turnips, collards, carrots, and more. Basically, anything you would plant in the spring can be planted again in the fall. The following are a few tips for a successful fall garden.  Tip #1: Time your Planting!Timing when to plant your fall garden is probably the most important factor. To determine the proper timing, you need two pieces of information. First, you need to know the average first frost date for your area. This is the date in the fall where on average (generally 50% of the time) the first hard or killing frost occurs. Remember, this is just an average so it is possible that the first frost may actually occur a week or two or even more in either direction. To determine your average first frost date, you can use a website such as the one by the National Climatic Data Center which gives the average frost dates for both spring and fall at various probabilities (I generally use the 50% one). There are plenty of other websites that give similar information but each one may vary slightly so you may want to check a few sites to get reliable date from multiple sources. The second piece of information you need is the average number of days to harvest for each vegetable you plant. This generally can be found on your packet of seeds. Different varieties of the same vegetable can vary greatly so you want to make sure you are using the dates from your specific variety not generic information for a general type of vegetable. In general, however, spinach, lettuce, and other greens grow quickly and will require fewer days to harvest and so can be planted in late summer or even early fall depending on your zone. Other vegetables that take longer to mature such as broccoli or cauliflower you will need to plant sooner, such as mid to late summer, again, depending on your zone. For example, if your vegetable takes 50 days to harvest and your average first frost date is October 1st then you would want to plant your seeds around August 12th which is 50 days before the average last frost date. Spinach and mustard greens grow quickly and can be planted later or multiple plantings staggered throughout late summer and early fall.Tip #2: Water your Seeds!Most years you will need to water more when planting a fall garden than for a summer garden. In general, we receive more rain in the spring and early summer so nature does a great job watering for us during those months. However, in our zone most of our planting for a fall garden needs to be done in mid-July to late-August. This is generally a drier time for much of the Northeast and Midwest so in order to receive optimal germination I usually water every 1-2 days until the seeds germinate and a good root system is established. Chinese cabbage and traditional cabbage grow much better in the fall when insects and slugs are less active.Tip #3: Cover your Plants!If your first frost comes earlier than expected there are ways to protect your plants so you do not lose your crops. The best way is to cover your plants to provide a few degrees of protection. The easiest way is to cover larger areas with a tarp or plastic of some kind, just do not let it touch the plants. You can also buy large frolls of cloth frost cover that is specifically designed to provide cold weather protection for plants. Frost covers come in a variety of thicknesses or you can double up for increased protection. Remember, however, that the thicker the cover the less light is allowed through. For individual plants, you can cover them with a milk jug with the top or bottom cut off or a pot or bucket. This can be time consuming depending on the size of your garden. Alternatively, you can plant your veggies in a greenhouse or cold frame. This requires more money upfront to build a greenhouse or cold frame. Most people are familiar with a greenhouse however a cheaper and easier version is to build a cold frame. This involves simply adding a clear “lid” to the top of a raised bed. This is generally glass or plastic. Many people recycle old windows and fit them to the top of a raised bed. The key with a cold frame is that they need to be lifted up to vent during the warm days and then closed at night to protect the plants from frost. Cold frames and greenhouses can significantly lengthen your growing season particularly in northern climates. Collards, peas, and broccoli are all great options for a fall garden. One of my favorite summer activities is gardening. My favorite types of gardening are vegetable and herb gardening. I grew up helping my parents with their garden and participated in 4H where I completed gardening activities and competed in the county fair. As a 12-year old I even had my own herb garden! One of the main reasons I enjoy gardening so much is because I love cooking and eating great-tasting food. Even if you live in an apartment there are ways you can still garden even if on a smaller scale. Container gardening or participating in a community garden are great options! In the following post, I will share some of my personal reasons for maintaining a vegetable garden and tips on how to get the most out of your garden. All the pictures that follow were taken from my garden this year. This is our first year gardening at our new house so we converted a field filled with grass and weeds into our garden. It is still a work in progress but even with a challenging rain-filled spring and early summer we have managed to produce a good number of fruits and vegetables. My Top 5 Reasons to Vegetable GardenReason 1: Taste and NutritionOne of the main reasons I love vegetable gardening is that fresh produce straight from the garden just tastes better. A sun-ripened tomato has so much more flavor and nutrition than one from the grocery store that was picked green and allowed to ripen on the truck, at the distributor, or at the store. Green tomatoes are often ripened via ethylene gas that is sprayed on them. Tomatoes naturally give off ethylene gas so there is likely nothing unsafe about this practice but it does have a huge effect on taste. Another reason I prefer fresh vegetables from the garden is that the time from plant to table is generally minutes to days whereas vegetables from the grocery store can be significantly older by time they make it to your plate. This dramatically affects the taste and nutrition of your food. 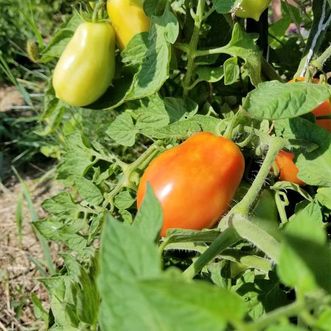 Roma tomatoes ripening in the sunReason 2: Saves MoneyThe second reason I love vegetable gardening is that it is cost effective. If you are new to gardening you will have to spend some money up front for the proper tools and supplies. However, much of the equipment can be re-used and will last for many years. You also need to buy seeds and/or plants to transplant each year but if your garden is successful you will make that money back many times over. If you have the room to start your own seeds indoors to transplant you will also save a significant amount of money. Finally, if you are trying to eat healthy or even organic it can get very expensive very quickly. Eating local is a great idea but not everyone can afford to do all their shopping at the local organic farmers market or grocery store. Growing your own vegetables, even if you do not use completely organic methods, does allow you to eat healthier even on a budget. Reason 3: Mental and Physical Well-BeingThe third reason I love gardening is because I love spending time outdoors. It is great for mental health and as a form of strength-building exercise. As an introvert, I absolutely need time outside away from crowds and people. Even a half hour working in my vegetable garden relaxes me, reduces anxiety, and keeps me grounded. I am also prone to joint and tendon issues so I need to be really careful about how much and what type of exercise and activities I participate in. Gardening allows me to stay active and increase my upper (and lower) body strength although it is very easy to overdo it! Reason 4: Passing it on to the Next GenerationThe forth reason I love gardening is because it allows me to raise my daughter in a manner that increases her activity, nutrition, and love of the outdoors. Heading out to the garden reduces screen time and keeps her moving and exploring. She absolutely LOVES picking vegetables and usually eats the tomatoes, carrots, peas, and green beans straight off the plants. It is also slowly teaching her patience. I have to remind her over an over that we need to wait to pick many of the vegetables until they fully mature and ripen. In my opinion one of the biggest problems (among many!) in America is the disconnect between the food supply and our dinner table. Most Americans do not know where their food comes from or how it is grown and produced. I love teaching my daughter that our food does not come from a grocery store! This is an even bigger problem with our meat supply but I will save that for another post! Reason 5: Self-SufficiencyMy last reason to garden is to increase self-sufficiency. It is virtually impossible these days to be completely self-sufficient. Ideally my family would be completely self-sufficient in regards to food, energy, finances, etc. However, this is generally not realistic for us or most other families. The time when you could make a living and provide for your family on your family farm is gone. However, food is one area where it is much easier to become at least partially self-sufficient. Growing your own fruit and vegetables and then learning proper preservation techniques is one of the best ways to become self-sufficient. I will focus another blog post in the future on preserving your harvest. If I have managed to convince you to maintain a vegetable garden then read on for some tips on how to garden most effectively. These tips are mostly designed for people just starting out but even if you are an experienced gardener you may find them helpful. Tips for Vegetable GardeningTip 1: Location, Location, Location!The first thing you need to think about when starting a vegetable garden is where you want to place your garden. If you are in apartment with a balcony obviously you would want to start there or in containers at a window. Whether you are gardening indoors or out, one of the biggest requirements is light. A south facing garden is best as most vegetables need a significant amount of light. If you are indoors you can always supplement natural light with fluorescent bulbs or grow bulbs. If you have a garden outdoors, the closer to the house the better. You are more likely to maintain your garden if it is easily accessible. Another consideration for location is soil quality and drainage. If you have many places to choose from you may want to get your soil tested before deciding on a location for the garden however even if the soil is not the best you can slowly amend the soil over the years to optimize growth. You also do not want to pick a very low-lying area where water tends to sit as good drainage is important for the growth of most plants. If you live in a dry arid climate you probably want to maximize drainage into your garden to decrease watering requirements. Our garden in Wisconsin is not limited by space or light unlike our raised beds when we lived in NY. We are lucky enough to have plenty of space and light but do have drainage issues in parts of the garden. 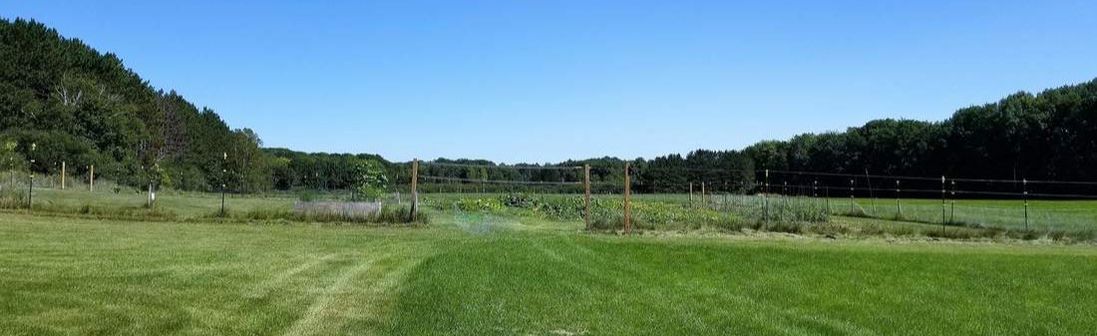 Vegetable Garden in the Middle of a FieldTip 2: Start Small!Once you have decided on location you need to pick a size for your garden. If you are new to gardening start small! It is very easy to get overwhelmed with a large garden and it is also more expensive in regards to time and money. You also need to buy less equipment with a smaller garden. You may be able to get away with just hand tools or a small hand-held rototiller. Larger gardens will likely require a walk-behind tiller or tractor with a roto-tiller. I am in the process of exploring no-till garden options but it can take many years to increase the quality of your soil to where this is a feasible option. As you can see from the above picture we did not take our own advice. We fenced in a half-acre, however probably 3/4 of the space is or will be dedicated to fruit and nut trees, grapes, and raspberries and other bush fruit. The last 1/4 is our vegetable garden which currently houses 2 raised beds but will hopefully have 4-6 in the future. Tip 3: Raised Beds!If you can afford it I would recommend at least one or two raised beds. You can fit more vegetables in a small space this way because the soil quality is usually better. If you make your own they may cost $100 or so each depending on the type of material you use, the soil you add, etc. This is an easy way to get a well-drained garden that isn’t too big and has high quality soil. I recommend adding in top soil, compost, and peat moss. If you are planning on many raised beds getting a dump truck load of soil and compost is much more economical than buying them in bags. 4’x8’ beds are optimal however I have tried 5’x10’ beds which worked but for a smaller person or child it is hard to reach to the center of a 5’ span. In addition to drainage and soil quality raised bed are great for any plant that you want to keep contained and prevent from spreading such as asparagus, horseradish, mint, etc. I currently have 3 raised beds, one for garlic, one for asparagus, and one for annual flowers. We hope to add one or two more each year. Ideally any smaller plants would go in raised beds although you can plant larger ones as well. In the future, I would love to grow onions, lettuce, spinach, peas, beans, broccoli, cauliflower, cabbage, peppers, and more in raised beds. The bigger plants like squash, pumpkins, and corn generally grow well and are easier to maintain directly in the ground. A great resource for raised bed gardening is Mel Bartholomew’s “Square Foot Gardening” book. Although he crowds his plants in a little closer than I do for many of mine it is still a great resource if you are just getting started. 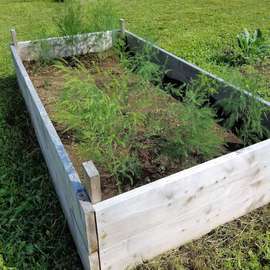 4x8 Foot Raised Asparagus BedTip 4: Don't Plant in Rows!The traditional way of planting involved straight rows of plants. However, you make better use of your space if you plant using the square foot method where you utilize all available space. Just remember to leave rows or spaces where you to need access to pick. For example, vine plants like winter squash and pumpkins easily overtake any rows you may try to maintain. However, these plants require very little maintenance throughout the growing season so I like to leave 6 or 8 feet between plants but designate an entire quadrant of my garden to them without any rows. For vegetables like leaf lettuce or spinach and beets and carrots I simply disperse my seeds into a quadrant that is small enough for me to reach into to weed if necessary. By skipping the rows I fit more vegetables into a smaller space. Although this does often require more thinning depending on how thickly the seeds are dispersed. 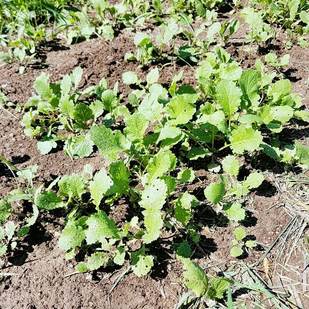 Turnips that are Dispersed, not Planted in Rows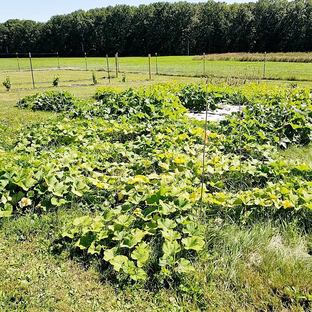 Winter Squash, Gourds, and Pumpkins without RowsTip 5: Mulch is your Friend!One of the best tips I have heard recently was to use cardboard boxes or newspaper to mulch your garden and prevent weeds. Spend the winter months collecting your newspaper and extra boxes or find free ones online. Remember to remove any plastic tape or metal staples from the boxes. The ink in newspapers is almost always soy-based so it is safe to use in gardens. Then when you plant your garden in the spring lay the boxes and newspapers out flat on the edges of your garden, in any rows, or between plantings to prevent weeds from growing. You’ll likely need to weigh your boxes and newspaper down with either mulch or rocks if mulch is in short supply. You can also use mulch directly without the boxes such as leaves from the fall, grass clippings, compost, etc. This will dramatically cut down on the amount of weeding you need to do and make gardening much more pleasant. 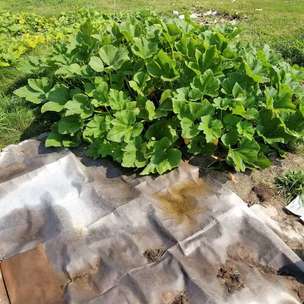 Cardboard Boxes Dramatically Decrease WeedsTip 6: Hill your Crops!My last tip involves drainage. If you cannot afford raised beds or don’t want to use all raised beds, drainage can be a huge issue depending on your location. This year we planted some of our vine crops in hills and others we just planted straight into the ground. Unfortunately, this spring and early summer we received 6 to 8 inches of rain above average for a three-month period. The squash planted in hills grew much better than the squash that was planted flat into the ground. Most of our crops that weren’t hilled such as some squash, onions, and peas rotted in the ground because the water didn’t drain well. So, if your garden is in a low-lying area, you have a high clay soil that doesn’t drain well, or you are prone to a wet spring/summer you may want to hill or mound many of your plants. It’s much easier to water your garden when needed then try to remove too much water. I’m sure there are many other tips and that I could come up with but please feel free to send any comments or questions to me, either in the comments section below or via my contact page. Also, if there is any topic that you wish me to cover in more detail please let me know. Other topics I would like to discuss in the future include fencing, composting, growing vegetables vertically, seed saving, preserving, and lots more! Drying Wildflowers I have recently started drying both wildflowers and cultivated flowers to sell on my Etsy and eBay sites (update, I no longer sell online). I love gardening but have minimal experience with ornamental gardening and flower gardening. I prefer vegetable and herb gardening (mostly because I like cooking and eating). When we moved into our home last summer we had so many flower beds that were only partially or not at all maintained. We did what we could last year to improve the flower beds and this Spring we bought a load of mulch to help reduce weeds and bring the beds back to life. Some flower beds have received more attention than others but hopefully, over the next few years, we will get them all back to their former glory. I have also slowly begun filling in the beds with multi-purpose herbs. Herbs are beautiful in flower beds and most can also be used in cooking or teas. I have also begun the long task of identifying all the bushes, shrubs, flowers, and ground covers in our beds. In addition, we have tons of wildflowers growing on our property some of which I am familiar with but many others are unknown to me. Pictured below are some of the wildflowers on our property which I have managed to identify. Unfortunately, many of them are invasive or not even native to my area. Wildflowers Oxeye Daisy Yellow Tansy White Yarrow |
AuthorIn 2016, my family and I moved from the New York City area to small town Wisconsin. Our move, this website and blog (and our previous Etsy store) is the result of our desire over the past several years to simplify our lives, increase our quality of life, reconnect with nature, and enjoy a more self-sufficient life. I grew up as a country kid in central Pennsylvania working on my grandfather's fruit farm and as a corn "de-tassler" at a local seed farm. My background is in biology where my love of nature originated. I am a former research scientist and professor and have now transitioned to a part-time stay-at-home mom, self-employed tutor, and small business owner. Thank you for taking the time to check out my site. Archives
April 2024
Categories
All
|


 RSS Feed