 Growing CeleryI always thought that growing celery (Apium graveolens) was difficult and required very moist conditions. However, there are now many varieties of celery, many of which are better adapted to drier growing conditions. One detail I learned after growing celery is that the bunches you buy at the store are the inner part of the plant. Celery also grows many outer ribs that are much narrower than the inner part of the celery. These outer ribs can be used just like regular celery, I like them in soups or stews, or I blanch and dehydrate them for celery powder. Favorite VarietiesCelery is one plant that I prefer hybrid varieties over open-pollinated. I have tried several open-pollinated but found they do not grow as well and are more bitter than the hybrid varieties I have tried. One caveat with this is that I have not tried blanching celery (keeping the stalks in the dark during the growing season and before harvest) which is supposed to keep it less bitter. One of the first hybrid varieties I tried was Tango and I had great success. It grew very well and is a faster-maturing variety at approximately 85 days. The next hybrid I tried is Kelvin and since I have grown that variety, it is the only one I have grown. It is like Tango, vigorous and low maintenance, but I feel it does better with hot temperatures (please note, I live in Wisconsin and my “hot” temperatures are nowhere close to what other parts of the country can hit) and lower moisture levels. It is also a faster-maturing variety at about 80 days. I use drip tape or soaker hoses connected to a timer throughout my garden, so this does help keep the soil evenly moist. Starting Celery From SeedCelery is one of the first seeds I start, about ten weeks before the average last frost date, due to its slow germination and subsequent slow growth. Celery seeds require light to germinate, so press them gently into your seed starting mix when starting seeds. A heat mat can help germinate the seeds if your grow room is cool, 70-75°F is ideal. After seeds germinate you can take them off the heat mat, so they are at about 60-70°F. I start fertilizing with an all-purpose liquid fertilizer once they start getting their true leaves with ¼ strength fertilizer. You can transplant them to a larger pot when they have at least 2 true leaves if you started them in smaller grow trays, I use 3.5” pots. Celery likes cooler weather, but cold temperatures can cause premature bolting so keep them above 45°F when hardening them off. I transplant into my garden about a week after my average last frost date.  Tiny celery seedlings soon after germination (center row). Growing CeleryKeep celery mulched well to maximize moisture in the soil and keep weeds down. Using some form of irrigation on a timer is helpful to keep the soil consistently moist. Celery is a very heavy feeder so make sure your soil is healthy before planting. Compost or composted manure is a great addition to any soil. I also fertilize monthly throughout the growing season with a high-nitrogen fertilizer like blood meal or fish emulsion. Harvesting CeleryThe entire stalk (plant) of celery can be harvested whenever it is large enough for your use or alternative individual ribs can be removed and used as needed. I have found if I leave celery in the garden for the entire summer, plants often start bolting closer to fall. If you want to collect celery seed you can let some plants bolt, I find my growing season (zone 4b) is unfortunately too short to harvest seed. 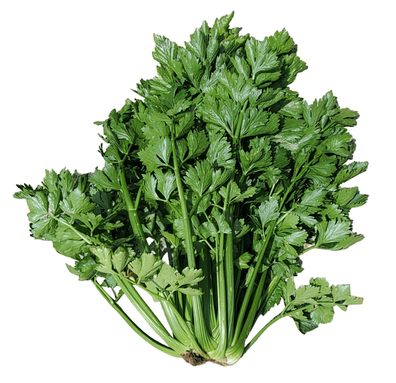 A monster celery I harvested that measured 30 inches tall! Celery DiseasesI have had some problems with celery that is misshapen and twisted with brown spots/streaks in the ribs. I have not had my celery tested for disease, but I believe it is either aster yellows, a disease caused by a phytoplasma, a bacteria-like organism, or leaf curl caused by anthracnose, a fungus. Aster yellows is transmitted by insects that feed on the plant so if you can control the insects, you can control the disease but once infected there is no way to treat the plant. Since I do not know whether I have a fungal disease or a phytoplasma disease, I choose to not treat my plants. Instead, when I find diseased plants, I pull them to prevent further spread, but I have never lost all my plants in a growing season. CautionVery rarely the foliage of celery and related plants (celeriac) can cause a reaction of the skin called photosensitivity or phytophotodermatitis. Compounds in celery, called psoralens, can cause blistering of the skin after the skin is exposed to sunlight. This is mostly seen in workers who harvest celery due to the extended amount of time they spend in contact with the vegetation. However, on sunny days it may be best to wear long sleeves and gloves when handling celery. ConclusionI highly recommend trying to grow celery in your garden. I was intimidated by growing celery because I thought it was something only commercial growers could reliably produce. But I find celery is one of the easier vegetables to grow in the garden and it has been a staple in my garden from the first year I tried it. References
0 Comments
 Growing Artichokes in Northern ClimatesArtichokes (Cynara cardunculus variety scolymus or Cynara Scolymus) are mostly grown in California, but anyone with approximately 100 frost-free days can grow them. On the central coast of California, artichokes grow as perennials, usually the Green Globe variety. But in other parts of the country, artichokes are grown as an annual plant. Here in central Wisconsin, zone 4b I grow the Imperial Star variety, which was specifically bred to produce artichokes the first year from seed, and most years I can get a great crop before our first frost hits. Starting Artichokes from SeedArtichokes are one of the first plants I start, about 10 weeks before my average last frost date, although anytime between 8-12 weeks should work. The seeds are relatively large and tough and can take 3 weeks to germinate. They germinate best with a heat mat but if you have a warm room (70-80°F) a heat mat is not necessary. Artichokes have a taproot so if you start them in a small 6-cell tray you want to transplant them into a larger pot when they are still small. To get good flower bud production (the part you eat) they need 10 days of colder temperatures in the 40s while they are still seedlings. I move mine outdoors as soon as possible to achieve these temperatures but bring them in at night if it is going to dip below 40 and I have never had a problem with them forming buds. 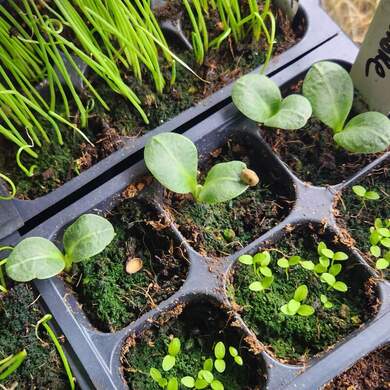 Artichoke seedlings (large leaves) just about to get their first true leaves. Growing ArtichokesTransplant your seedlings after the danger of frost has passed or protect them from frost with a frost cover. They get very large, roughly 3 feet across, so plan on lots of room for them to grow. They also like very fertile soil, especially high levels of nitrogen. You can use compost, blood meal, composted manure, or fish emulsion. I try to fertilize monthly but if your soil is poor an application every 2 weeks may be better. Artichokes need plenty of water once they start producing flower buds. I keep my plants mulched with either leaves, cardboard, straw, or wood chips. This keeps moisture in the soil and reduces weed pressure. We also use drip tape throughout our garden to keep the soil moist without overwatering. Wood chips can reduce nitrogen levels at the soil surface or throughout the soil if you till them in at the end of the season. We have healthy soil and add compost and composted manure every year, so we see no decline in growth. However, we do not use wood chips around young seedlings with shallower root growth. HarvestingWhen the flower buds are large, but the bracts are not fully open cut the artichokes off the plant at their base to harvest them. The main bud matures first, then several side buds mature later. You can allow some buds to fully flower; they turn into a beautiful purple flower that that bees love. The flower looks like a thistle flower which makes sense since the genus Cynara contains thistle-type plants. 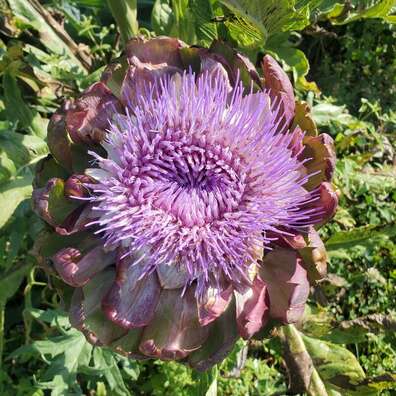 Imperial Star artichoke flower. Eating ArtichokesMy favorite way to eat artichokes is to steam them for approximately 45 minutes. The smaller side shoot ones can be cooked for less time. Then remove the leaves individually and eat the fleshy base until you get to the center, the heart of the artichoke. The inedible, woody, spiny choke on top of the heart is removed and then the heart can be eaten. I like to eat the fleshy part of the leaves and the heart with garlic-herb goat cheese but there are lots of other ways to eat artichokes. 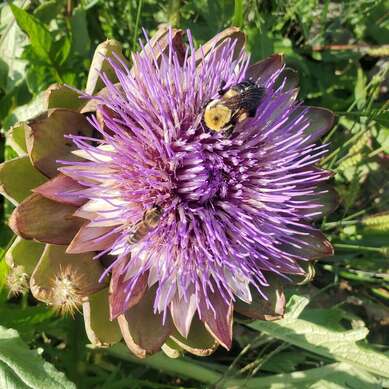 Bees also seem to love artichoke flowers. ConclusionI was very intimidated to grow artichokes for the first time as I, like many people, thought artichokes could not be grown in northern climates. However, artichokes are one of the easiest vegetables to grow in the garden. Once planted, they are low maintenance, and due to their spiky, thistle-like growth are deer and rabbit-resistant. I have also never had any insect damage, making them one of the easiest plants to grow. 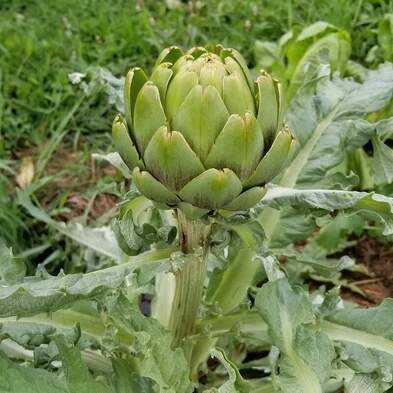 Imperial Star artichoke. References
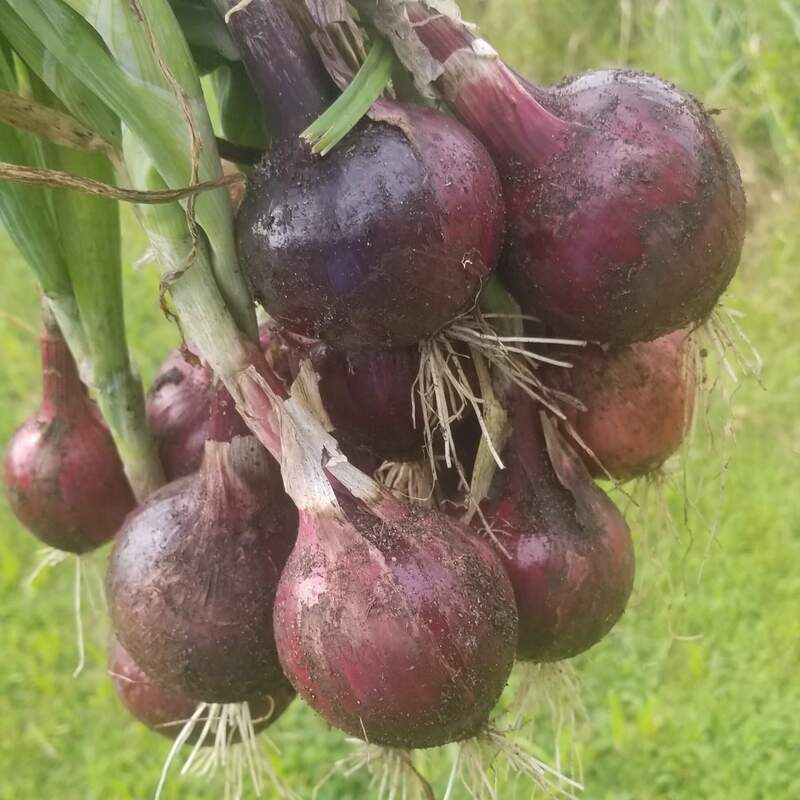
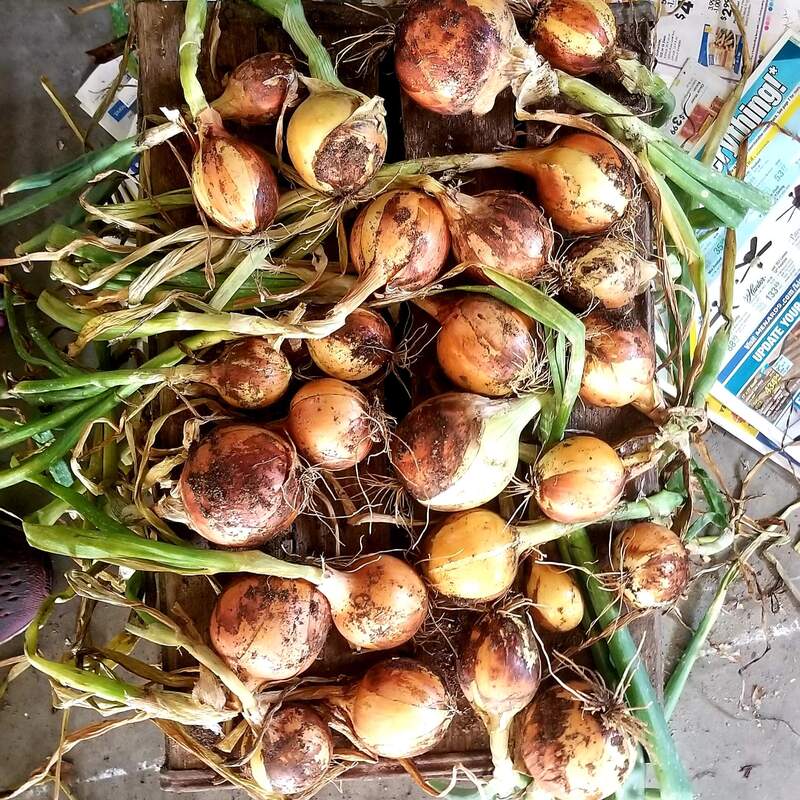
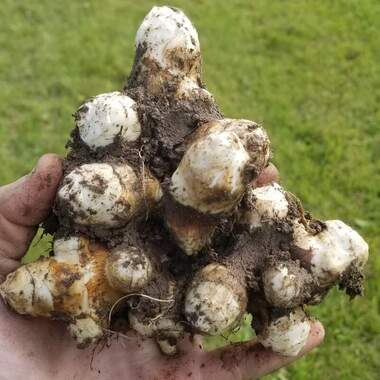 Jerusalem ArtichokesIntroductionJerusalem artichokes (Helianthus tuberosus) are related to sunflowers (Helianthus annuus) giving them their alternative name, sunchoke. They produce tubers that can be dug up and eaten. Jerusalem artichokes are neither from Jerusalem nor are they closely related to artichokes (both are part of the Asteraceae family but do not share a genus). Instead, sunchokes are a native North American plant that the Native Americans ate. Jerusalem artichokes are very easy to grow, plant the tubers one time and they will grow as a perennial year after year. Many people claim Jerusalem artichokes are invasive, which is not accurate since they are native, although they can become invasive in regions where they were not originally native. Jerusalem artichokes, however, can be very aggressive. Therefore, do not plant sunchokes where you do not want them to spread or expect to devote a significant amount of time to digging up tubers to keep the plants contained. I planted my Jerusalem artichokes outside my garden with plenty of space to mow around them. We have had them for approximately 6 years and while they have spread slightly, they have mostly remained contained to one area. The tubers of Jerusalem artichokes grow underground and can be eaten raw or cooked. Before eating large amounts of sunchokes for the first time, you should be aware that they store their carbohydrates as inulin. Inulin is considered a prebiotic because is not digested in the intestines but instead feeds beneficial bacteria. This is thought to help maintain digestive health and may be beneficial for diabetics as the inulin is not broken down to sugar like many other starches. However, the major side effect of inulin is the production of gas by bacteria in the gut as they break down the starch. Therefore, a common, and well-deserved nickname for Jerusalem artichokes is “fartichokes” and only small amounts should be ingested first to see how your body reacts. Overconsumption can lead to painful bloating, gas, and diarrhea. Other foods that contain large amounts of inulin include onions, artichokes, asparagus, and chicory. However, these foods are rarely consumed in quantities large enough to cause gastric distress. How to Grow Jerusalem ArtichokesYou can buy Jerusalem Artichoke tubers from many seed suppliers, I purchased them from Jung Seed but Fedco Bulbs also sells them. They can be planted in most soil types, but if your soil is especially poor amend with compost or composted manure first. You can plant the tubers in early spring as soon as the soil can be worked or in warmer climates they can be planted in the fall. They are very cold hardy, and grow well for me in central Wisconsin, zone 4b, but will grow from zones 3-9. Plant the tubers about 6 inches deep, roughly 12 inches to 2 feet apart. We planted six tubers and eventually ended up with a patch roughly 4x6 feet which is more than enough for our small family of three. The plants grow very tall, 10-12 feet high, so do not plant them where they will shade other plants that need full sun. I try to keep my bed mulched to reduce weeds but since sunchokes are vigorous plants they grow well even with high weed pressure. To increase tuber size, you can cut off the tops of the plants when they begin to flower. In my zone, we only sometimes see full flowering since sunchokes flower late in the season. If you do let them flower, however, they are beautiful sunflower-like flowers. The flowers are smaller than most sunflowers and multi-stemmed. 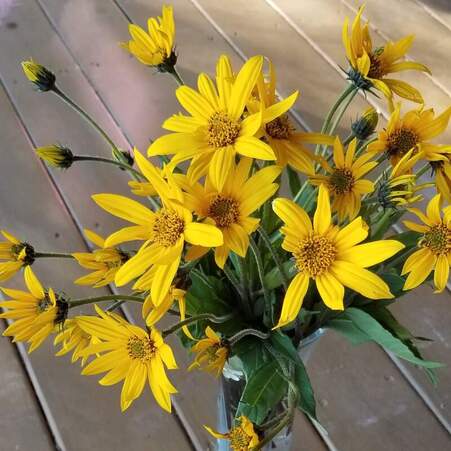 The flowers of the Jerusalem artichoke are similar to sunflowers. Harvesting Jerusalem ArtichokesUsually, Jerusalem artichokes are harvested in late fall after frost and the foliage has died back. You can dig them up sooner, but the cold is supposed to improve the flavor of the tubers. We usually dig the tubers with a shovel, but you can also use a garden fork to loosen the soil and pull out the tubers by the stem. Harvesting all the tubers is almost impossible; any remaining behind will grow into next year's crop. Unfortunately, Jerusalem artichokes do not store well so it is recommended that you only pick as many as you can eat in a couple of weeks. I have also sliced, blanched, and frozen or dehydrated them to use later. I have also tried fermenting them (you can find recipes online) but I had mold grow the first time and was not a huge fan of their taste the second time when they fermented successfully. 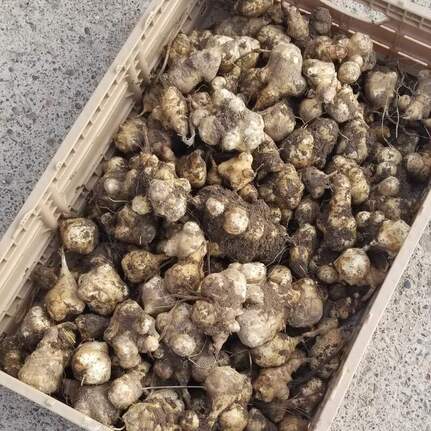 Jerusalem artichoke harvest from approximately a 4x6 foot plot. How to Eat Jerusalem ArtichokesJerusalem artichokes are knobby and should be peeled or scrubbed well to remove the dirt. They can be eaten raw, for example, sliced onto a salad, but my preferred method of eating them is cooked. I like to slice and boil them slightly to soften them and then sauté them in cast iron with shallot or onion. I find Jerusalem artichokes to have a strong flavor, somewhat nutty, and unique. For our family, sunchokes are a good supplement to our food supply, especially since after planting, they are very low maintenance. 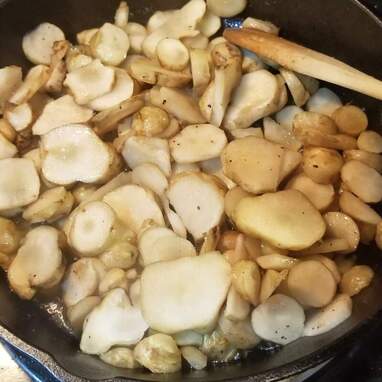 My favorite way to eat Jerusalem artichokes is pan-fried in cast iron. ReferencesCox, Jeff. 1988. How to Grow Vegetables Organically. Rodale’s Organic Gardening Magazine, Rodale Press, Emmaus, Pennsylvania. Growing Great OnionsIntroductionOnions (Allium cepa) were one of the first plants to be domesticated, likely over 4000 years ago, for both culinary and medicinal purposes (1). Various onion species are native to much of the northern hemisphere and parts of the southern hemisphere as well (1). Onions belong to the Allium genus along with many other familiar species including garlic (A. sativum), shallots (A. cepa, previously A. ascalonicum), leeks (A. ampeloprasum), chives (A. schoenoprasum), garlic chives (A. tubersosum) and scallions or green, bunching, or spring onions, consisting of several different species including A. cepa (1). Selecting the Correct Day Length Onion To grow great onions, you must know what type grows best in your location. Although growing conditions are important, onions form their bulbs in response to day length. Onions sense the number of hours of daylight and use that as a signal to switch their energy from leaf growth to bulb growth. Daylight hours are based on your latitude and the number of daylight hours needed for onions varies by the variety of onion. There are three types of onions, long-day, intermediate-day, and short-day. Johnny’s Selected Seeds has a map available online to help you determine which types of onions will grow best at your latitude. You can also look up your exact latitude on this website. I am located at 44.7° latitude, so I only grow long-day onions. Long-Day Onions Long-day onions are grown in the northern United States, roughly from Pennsylvania to Oregon (37°-47° latitude) and northwards. They start forming bulbs when days reach roughly 14-16 hours long. Many long-day onions make good storage onions although some sweet varieties that traditionally do not store well can also be grown. These onions are usually planted in early spring and mature in late summer to early fall. Intermediate-Day Onions Intermediate-day onions grow best from 32°-42° latitude, approximately from northern California to Virginia and south to northern Texas and South Carolina, however, they will bulb in almost any growing area. They start producing bulbs when the days reach approximately 12-14 hours long. These onions tend to be sweet onions, which generally do not store as well. If you are further north you want to plant these in the spring but if you live further south with mild winters you can plant in the fall and harvest in the spring or early summer. Short-Day Onions Short-day onions are grown from approximately 25°-35° latitude and start forming bulbs when days are roughly 10-12 hours long. These onions grow best in Florida to southern California and are usually planted in the fall to overwinter and mature in the late spring or early summer. Types of OnionsOnce you know your day length you can decide what type of onion you want to grow. There are many varieties, but they can be lumped into several groups including red onions, yellow onions, white onions, bunching onions (AKA scallions, green, or spring onions), and sweet onions. I live in Wisconsin so I only grow long-day onions and I mostly grow onions for storage because I also have walking onions which I can use throughout the growing season since they overwinter. I also grow some scallions for use throughout the growing season (eventually the walking onions get woody when they set their bulbs on top). Traditionally yellow onions are used for cooking and make the best storage onions but there are quite a few varieties of red onions that also store well. I prefer red onions for pickling and grilling but frequently use them for cooking as well since I grow a lot of them. Red onions are also traditionally used raw on salads. White onions tend to be milder than red or yellow onions and are often eaten both raw and cooked. I have never grown sweet onions because they tend not to store well although for many people this is their favorite variety and I have plans to try them at some point in the future. Sweet onions are the mildest onions and therefore are often eaten raw (I grew up occasionally eating an onion, cheese, and mustard sandwich!) but can be cooked as well. My Favorite OnionsYellow OnionsI always grow Patterson (F1) onions as they traditionally store well for 6 months or more. I have also started growing New York Early (open-pollinated) onions and they are earlier than other varieties I have grown, and they also grow very large for me. They do not store as long, approximately 3 months, but since they finish earlier, I just use these first while I am waiting for the better storage onions to finish growing. I am also trying a new variety this year, Talon (F1), and can update you on their growth later this fall (2024). Another open-pollinated variety that has grown well for me is Yellow of Parma and they also store well. Stuttgarter (open-pollinated) is a yellow onion variety that I have grown in the past, it stores well, and you can often find this variety as sets, although I have more difficulty finding seeds which is why I switched to growing Patterson. White OnionsThe only white onion I have tried growing is Southport White Globe (open-pollinated). These only form small bulbs but I like them when I only need a little onion for a recipe. They can also be picked young as spring onions but are some of the best white storage onions available. Red OnionsI have grown several varieties of red onions, and these always seem to do better for me than yellow onions. Redwing (F1), Red Bull (F1), and Red Wethersfield (open-pollinated) are all good storage onions that grow well for me. This year I am also trying Red Geneva (open-pollinated), Red Mountain (F1) as a Red Wing replacement (I could not find Red Wing seed this year), and Ruby Red (open-pollinated).  Red onions always seem to grow the best for me. Scallions (AKA Bunching, Green, or Spring Onions)Bunching onions are very easy to grow because they grow quickly, and you do not need to worry about bulb formation. I have had good luck with Evergreen, Tokyo Long White, and Red Beard bunching onions, all open-pollinated varieties. The Evergreen bunching onions are also hardy enough that they can overwinter in some areas (for me in Central Wisconsin, zone 4b I have had mixed results overwintering). Sweet OnionsI have yet to try growing sweet onions, but I have heard Ailsa Craig, Yellow Sweet Spanish, and Walla Walla, are all good long-day open-pollinated varieties and on my list to try growing someday. Growing Onions from Sets, Seedlings, or SeedsOnion SetsGrowing onions from sets (dry, pre-started bulbs) is the easiest way to grow onions and the easiest to find at most greenhouses and home improvement-type stores. The disadvantage of sets is that they are more likely to bolt, especially the larger sets, making the bulbs woody and prone to rotting (2). I have also found onions grown from sets are less likely to get to a large size. Sets are made by starting onions from seed and then disrupting their growth when they are just starting to form bulbs. When you plant the small bulbs, they wake up from dormancy and resume growing. Sets are also more expensive to buy than seed. Onion SeedlingsA second option is buying onion seedlings or transplants. These can sometimes be found in local greenhouses but are generally harder to source. I have not bought onion transplants from Dixondale Farms because I start all my onions from seed, but I have heard great reviews from other gardeners about them. One advantage of suppliers like Dixondale is that you can have the seedlings shipped if you cannot find transplants locally and they have a bigger selection of varieties than most greenhouses. The advantage of transplants in general is that you do not have interrupted growth after bulb formation like you do with sets, so your onions are less likely to bolt and you are more likely to get large bulbs. However, like sets, transplants are more expensive than seeds. 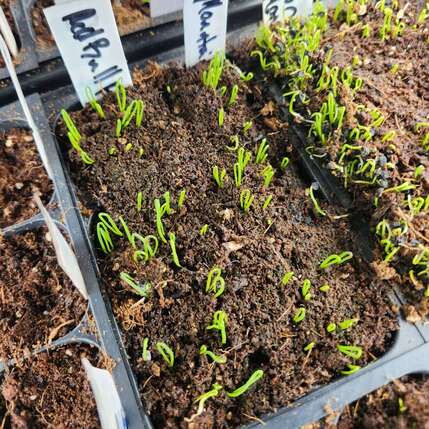 Onion seedlings that are just starting to emerge. Onion SeedsThe last option for those who like to start their plants is to use seeds. These have the same advantages as buying seedlings, but you generally have many more options for varieties of onions if you are willing to buy seeds online. One disadvantage of seeds is that onion seeds lose viability very quickly and it is the one seed type I always try to buy new each year. Although if you buy sets or transplants you also need to buy new ones each year. I have successfully used one and even two-year-old seeds, but germination is generally 50-75% lower after even one year. If you do save onion seeds, it is best to store them in the refrigerator or freezer in an airtight container with a little silica gel to absorb moisture.  These onion seedlings are large enough that they can be trimmed back to 4 inches to keep them from flopping over and make them fit better under the lights. Starting Onions from SeedIf you start onions from seed, they are generally started early as they are cold hardy, and so can be planted out early. I start my onions at the end of February, which is eight weeks before my average last frost date in mid-May (2). Onion seeds are very easy to start assuming the seeds are fresh. As stated above onion seeds lose viability very quickly so you generally want to buy new seeds each year. You can also plant onion seeds close together as they are easy to separate when transplanting. I sprinkle quite a few in a 6-cell or 3-inch pot. Cover with about a 1/2" inch of moistened light potting soil (like Pro-Mix) or seed starting mix. Bottom water as needed to keep the soil moist but not sopping wet. You can also use a humidity dome to help keep them moist. My seeds usually germinate in a week or two with a heat mat, but it can take up to 3 weeks to see germination. Onion seeds will germinate in colder temperatures so a heat mat is not necessary, but it will speed germination. Start fertilizing when the seedlings have fully emerged and are about an inch high with half or quarter-strength liquid fertilizer (nitrogen-based fertilizer is best but an all-purpose one will work fine as well) and continue to fertilize weekly with a dilute solution. Once the seedlings are over about four or five inches, I trim the tops to keep them a more manageable size. Start hardening them off about a month before your last frost date and transplant them as soon as the weather cooperates. I try to get mine transplanted by mid to late April, but we sometimes still have snow at this time which delays planting. For more information on seed starting in general you can refer back to my earlier blog post on the basics of seed starting. 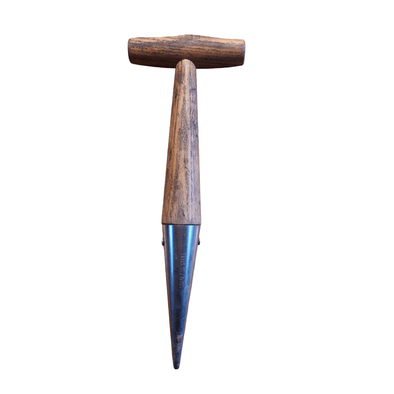 A dibble tool that is used to plant onion transplants, bulbs like tulips or daffodils, and garlic. Planting OnionsTo plant onions, sets are the easiest. Simply dig a shallow trench, pop the onion sets down about 4-6 inches apart, and cover with soil so they are just below the surface. Rows should be about 12 inches apart, but I plant so many onions I often plant them closer to approximately 6-inch rows. If you have fertile soil amended with compost or composted manure, close spacing should not be a problem. I like to mulch between the rows with something like shredded leaves. I find onions are a pain to weed so getting some mulch in early to reduce weed pressure is helpful. To plant seedlings, either ones you grew or purchased, I find using a dibble (AKA dibber) is helpful. A dibble is simply a sharpened stake attached to a handle that is also useful when planting bulbs, garlic, etc. Once my onion bed is prepared (rake out, mix in compost, fertilizer, etc.), I lay down the mulch. I used to mulch after I planted the onions, but it is a pain to get the mulch around the tiny transplants without covering them up. Last year I mulched first before making my holes and it was much easier. I use the dibble to push a hole through the mulch and soil. Pop in the seedlings and tamp around to firm the soil around the transplants. Onions like full sun, and if you have heavy soil a raised bed will help with soil drainage and improve your bulb size. I like to use nitrogen-rich fertilizer monthly throughout the growing season such as fish emulsion or blood meal. Stop fertilizing when the necks of the onions start softening before they fall over. Once they fall over, they are done growing and bulb size will no longer increase. 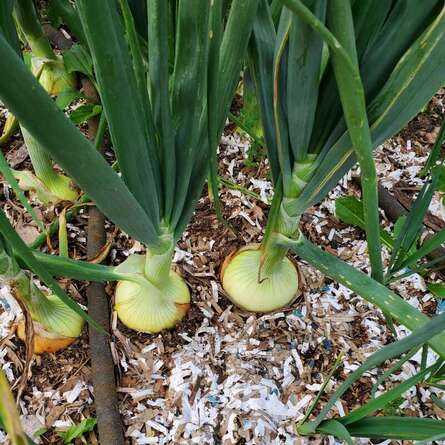 Yellow onions growing in my raised beds with a soaker hose for watering and shredded paper as a mulch to keep down weed pressure. Harvesting OnionsOnions are ready to be harvested when the necks soften and about half the tops fall over (3). You can knock the rest of the tops over, wait a few days, and then harvest all of them (2) or I just wait until they fall over naturally and harvest every few days. Harvest the onions and shake excess dirt off but do not clean them. After harvesting, storage onions need to be cured for about 2 weeks or until they are completely dried. I like to hang them upside down on a rack or lay them down on newspaper or cardboard in my garage. Do not allow them to be in direct sunlight for too long or they will turn green and make sure they are well-ventilated, or they may rot (3). After they are completely dried, I cut off the tops and store the bulbs in cardboard produce boxes (holes for ventilation) or mesh bags. I store my onions in my garage which is heated in the winter to about 45° F and many last until spring. Check your onions every few weeks to throw out any that have gotten soft or started rotting. 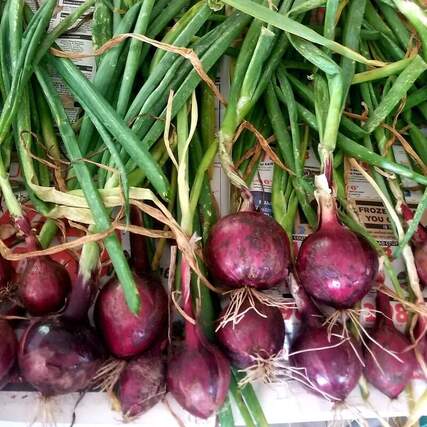 Red onions laid out on newspaper in my garage to cure. Saving Onion SeedI like to save onion seeds, particularly from my heirloom Zebrune shallots since they are open-pollinated but I also collected a mix of red onion seeds last year (2023). Onions will cross-pollinate so if you are saving seed and want to keep it pure you want to make sure you only have a single variety flowering at the same time nearby. However, onions and leeks, for example, are different species and should not cross-pollinate. Onions are biennial so if you want to save seed you have to save bulbs from the previous year and plant them out in the spring. Because they already went through one growing season they should quickly flower and go to seed. The red onions I planted last year were from bulbs I grew in 2022 but I did not keep them separate so I likely had a mix of varieties plus many were also hybrid so they may not be like their parents. However, I like to experiment, so I planted the seeds this year and so far, the seeds look like they have a high level of germination and are very vigorous. ConclusionOnions are one of my favorite vegetables to grow, I think because they store well over winter without any extra work. You do not need to blanch and freeze them like many other vegetables, just keep them cool and dry. I do like to dehydrate some to grind up for onion powder and I have not needed to buy garlic or onion powder in years. I also like to pickle some to use on hamburgers and salads. I grow as many onions as I can handle, because honestly as much as I love harvesting the onions at the end of the season, the planting and weeding can be back-breaking work, but well worth it. References
|
AuthorIn 2016, my family and I moved from the New York City area to small town Wisconsin. Our move, this website and blog (and our previous Etsy store) is the result of our desire over the past several years to simplify our lives, increase our quality of life, reconnect with nature, and enjoy a more self-sufficient life. I grew up as a country kid in central Pennsylvania working on my grandfather's fruit farm and as a corn "de-tassler" at a local seed farm. My background is in biology where my love of nature originated. I am a former research scientist and professor and have now transitioned to a part-time stay-at-home mom, self-employed tutor, and small business owner. Thank you for taking the time to check out my site. Archives
July 2024
Categories
All
|
 RSS Feed